FHIR Repository customization with Embedded Python
The objective of the article is to provide the reader with the following informations:
- Configure and use the FHIR server
- Create an OAuth2 Authorization Server
- Bind the FHIR server to the OAuth2 Authorization Server for support of SMART on FHIR
- Use the interoperability capabilities of IRIS for Health to filter FHIR resources
- Create a custom operation on the FHIR server
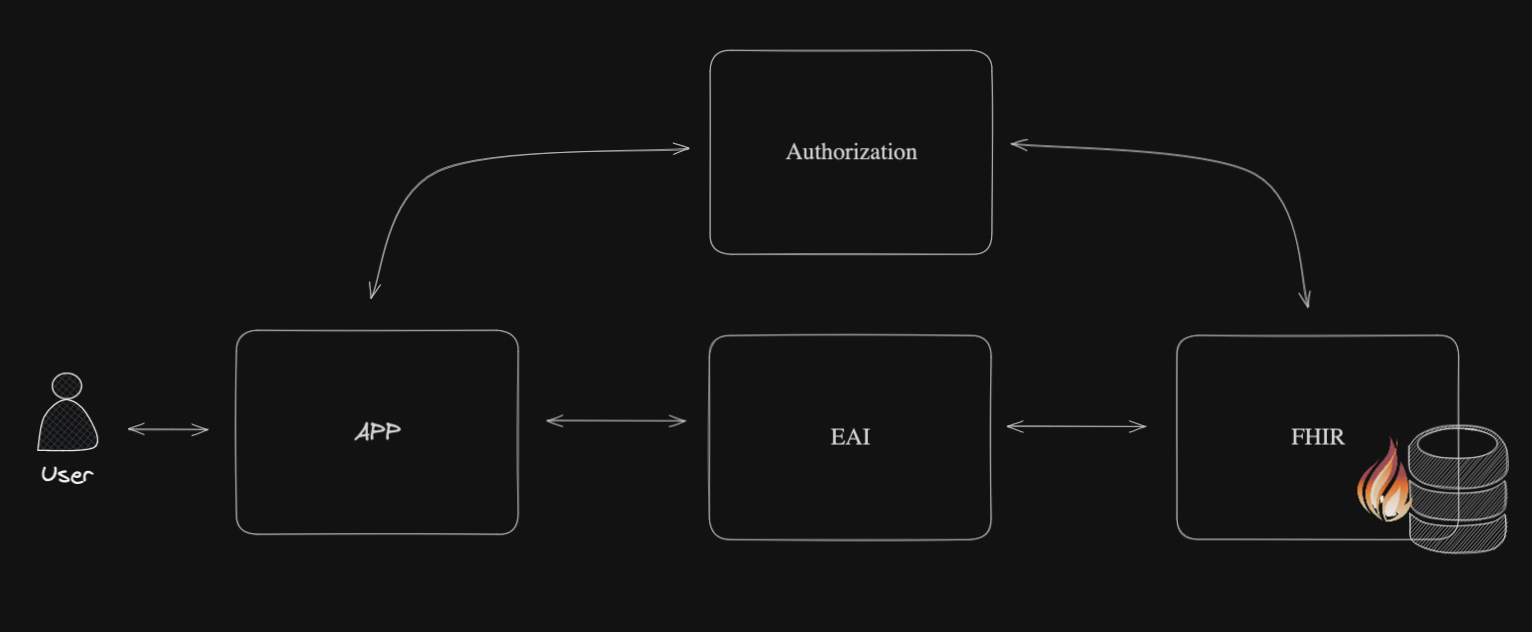
Schema of the article:
Workflow of the article:
1. Table of Contents
- 1. Table of Contents
- 2. Objectives
- 3. Installation
- 4. Configuration of the OAuth2 Authorization Server
- 5. Configuration of the Client
- 6. Configuration of the FHIR server
- 7. Filter FHIR Resources with InterSystems IRIS for Health
- 8. Create the custom operation
- 9. Tips & Tricks
2. Objectives
This training aims to provide the participants with the following skills:
- Configure and use the FHIR server
- Create an OAuth2 Authorization Server
- Bind the FHIR server to the OAuth2 Authorization Server for support of SMART on FHIR
- Use the interoperability capabilities of IRIS for Health to filter FHIR resources
- Create a custom operation on the FHIR server
3. Installation
To install the training environment, you need to have Docker and Docker Compose installed on your machine.
You can install Docker and Docker Compose by following the instructions on the Docker website.
Once you have Docker and Docker Compose installed, you can clone this repository and run the following command:
docker-compose up -d
This command will start the IRIS for Health container and the Web Gateway container to expose the FHIR server over HTTPS.
3.1. Access to the FHIR server
Once the containers are started, you can access the FHIR server at the following URL:
https://localhost:4443/fhir/r5/
3.2. Access the InterSystems IRIS Management Portal
You can access the InterSystems IRIS Management Portal at the following URL:
http://localhost:8089/csp/sys/UtilHome.csp
The default username and password are SuperUser and SYS.
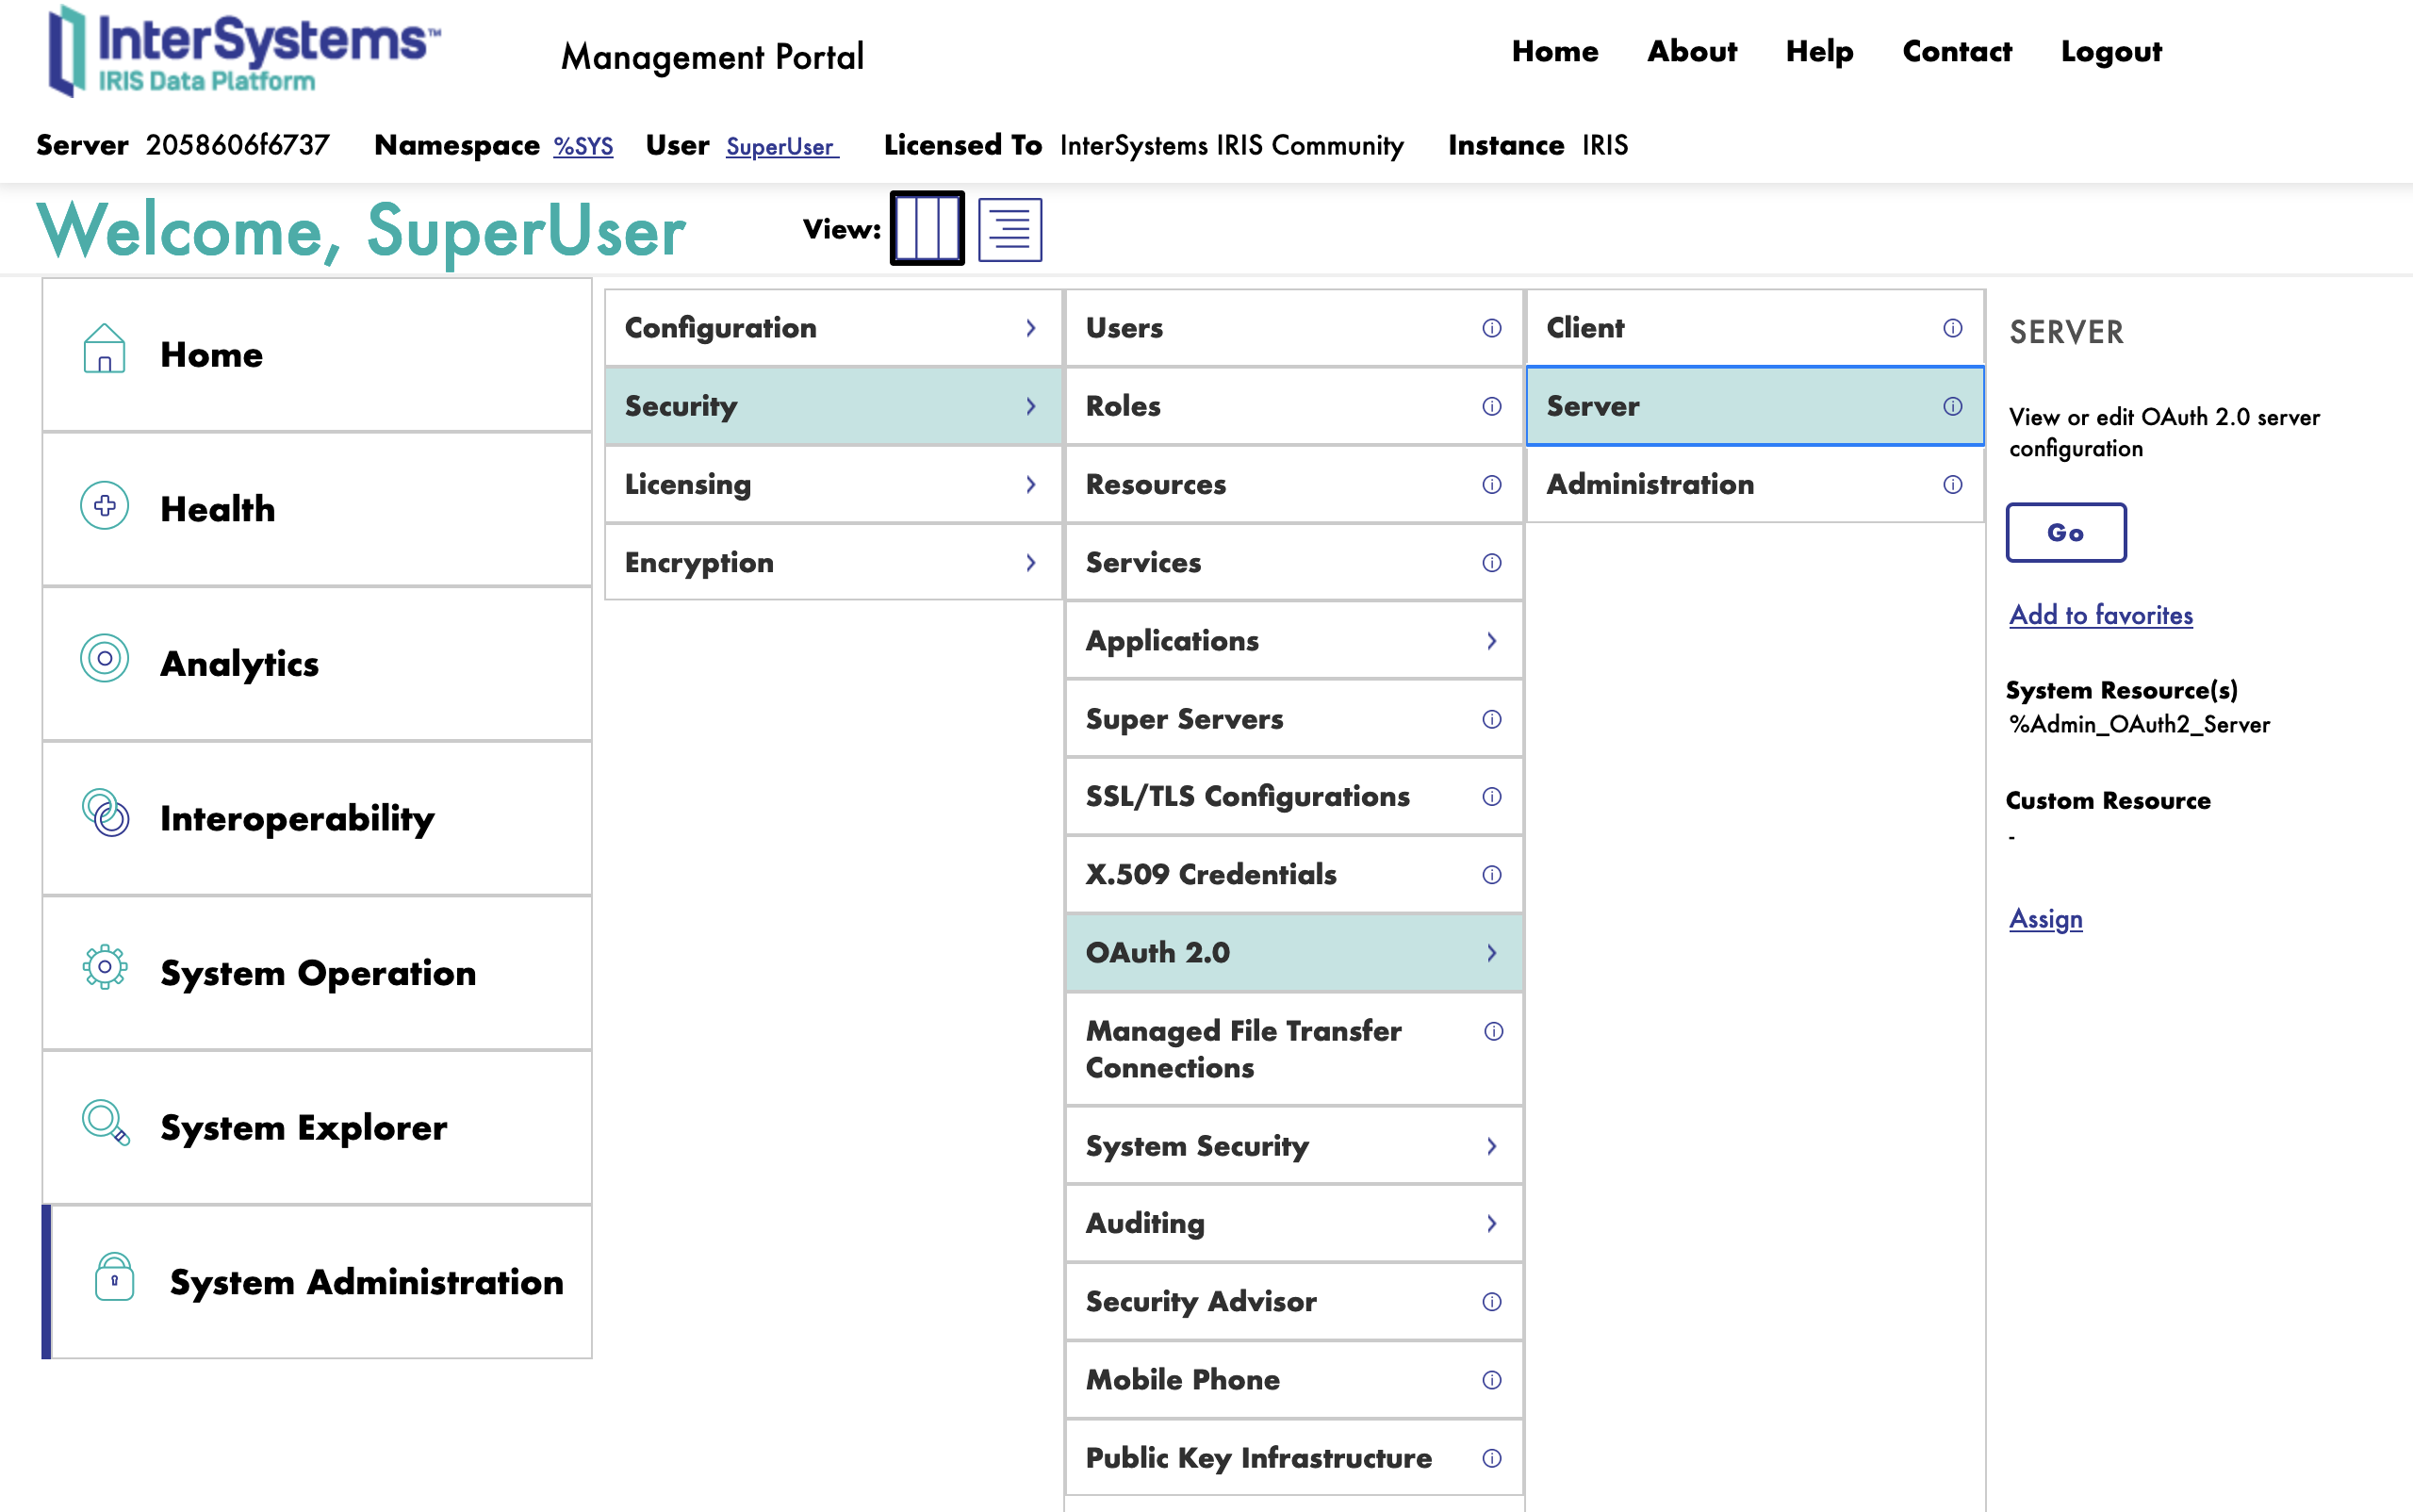
4. Configuration of the OAuth2 Authorization Server
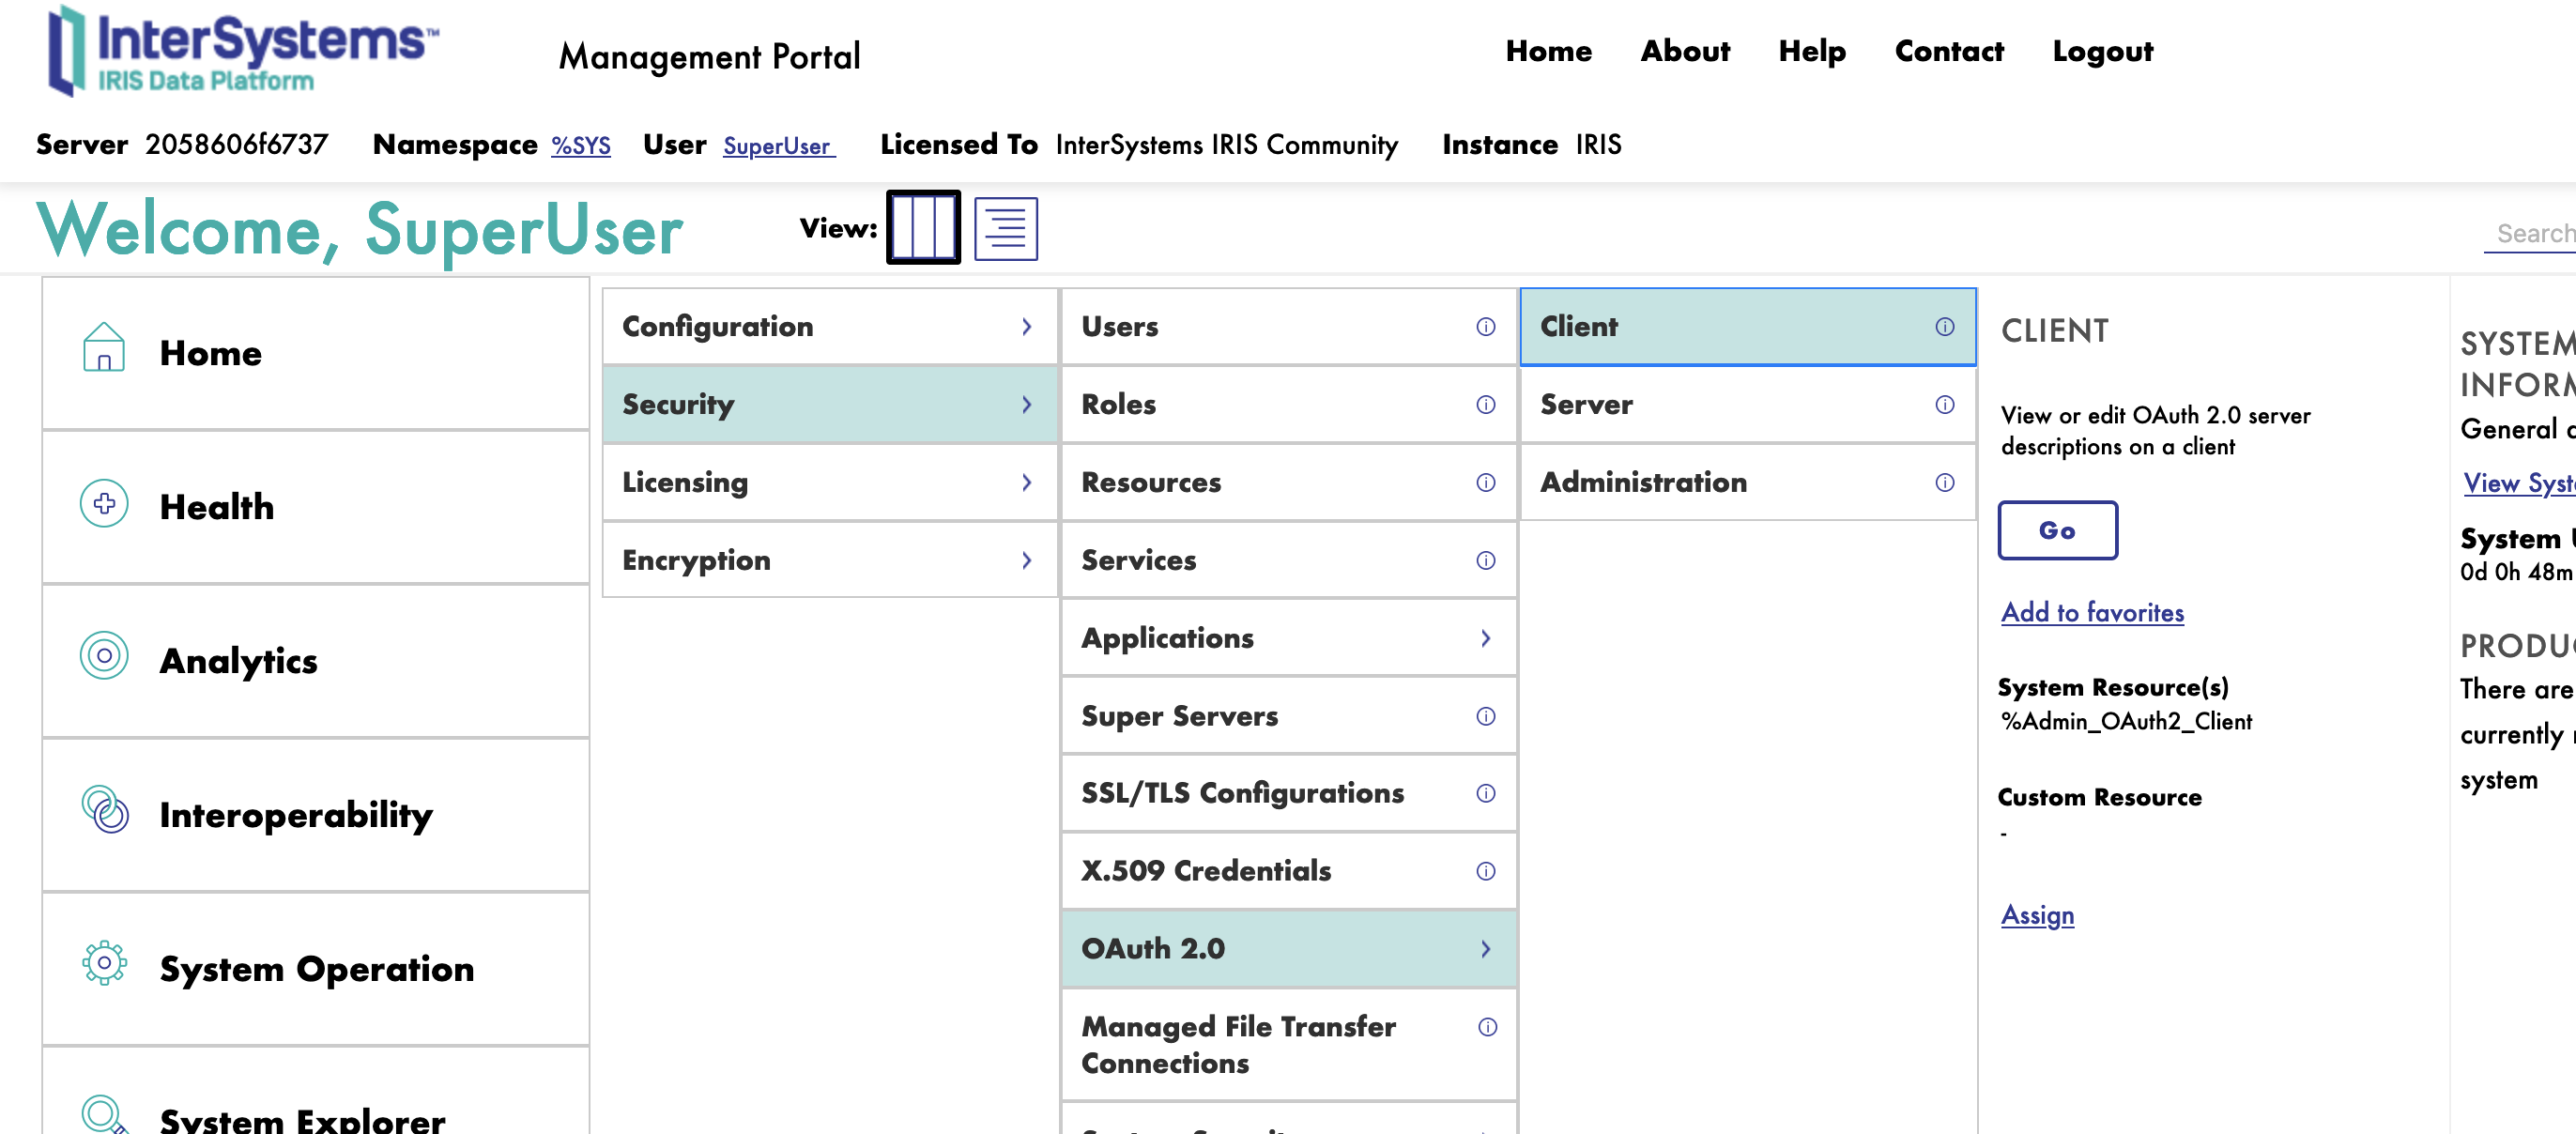
To configure the OAuth2 Authorization Server, you need to connect to the InterSystems IRIS Management Portal and navigate to the System Administration > Security > OAuth 2.0 > Servers.
Next, we will fulfill the form to create a new OAuth2 Authorization Server.
4.1. General Tab
First we start with the General tab.
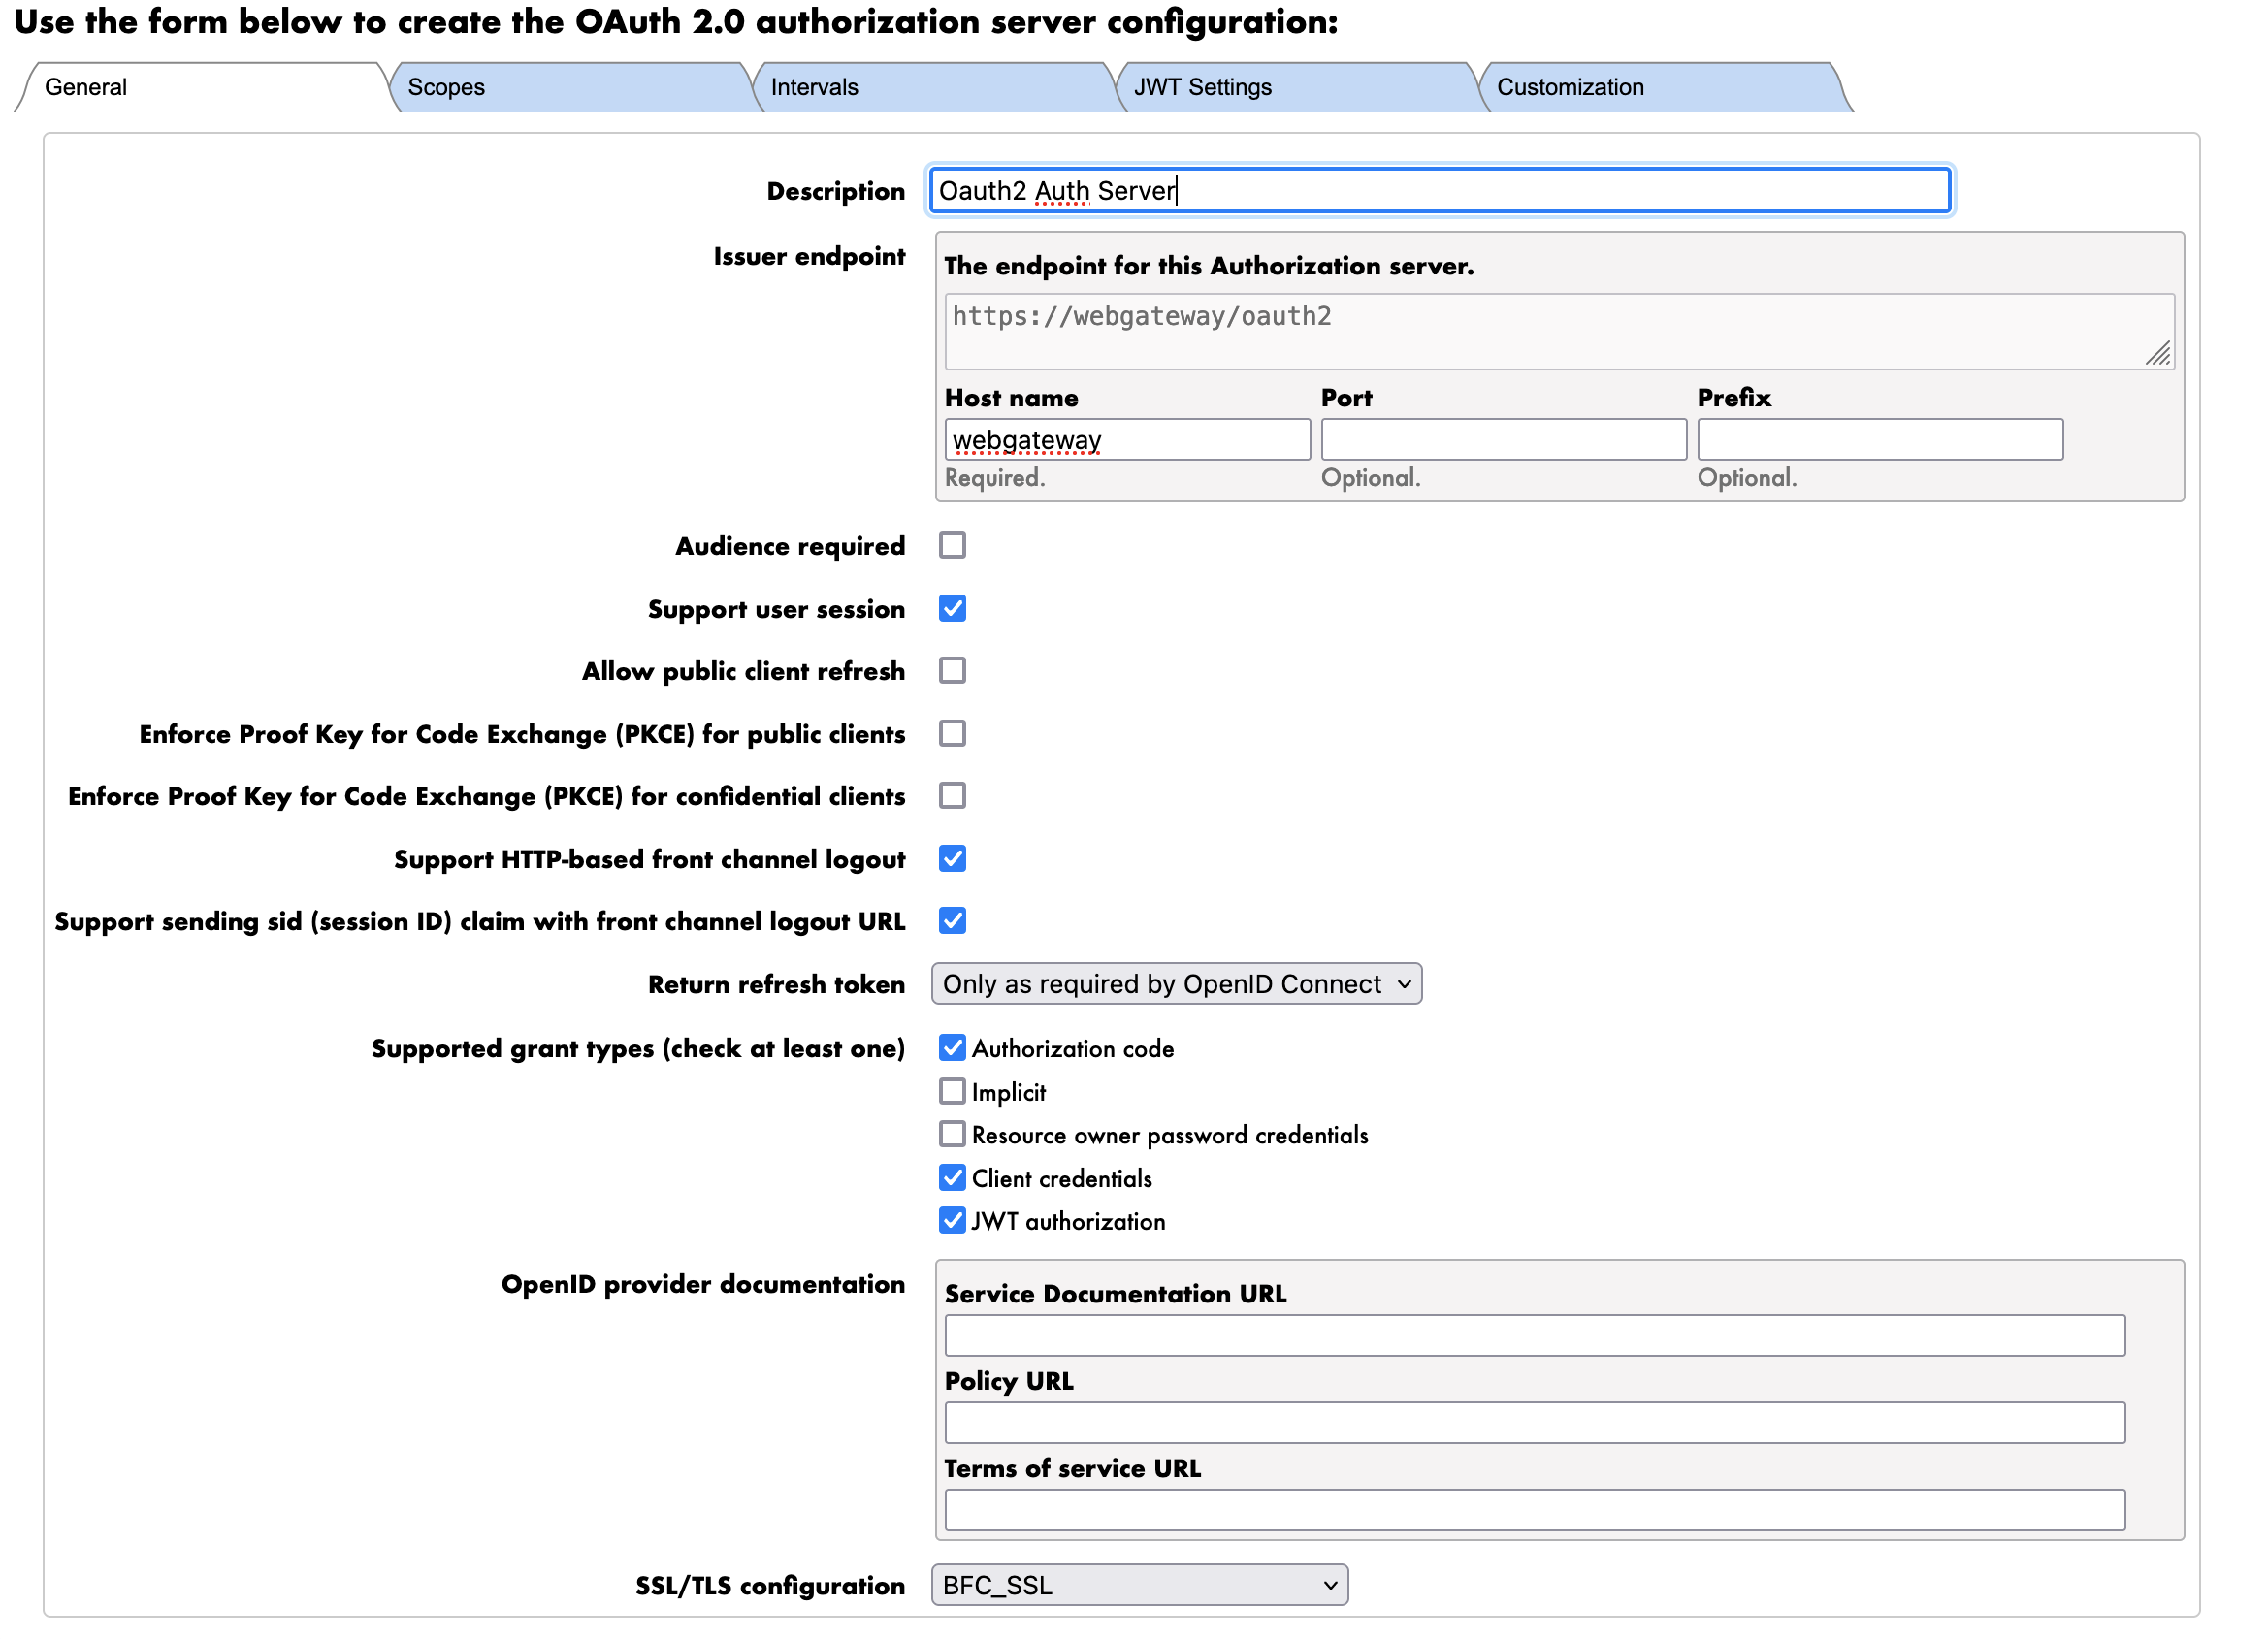
The parameters are as follows:
- Description: The description of the OAuth2 Authorization Server
- Oauth2 Auth Server
- Issuer: The URL of the OAuth2 Authorization Server
- https://webgateway/oauth2
- NOTE : Here we use the URL of the Web Gateway to expose the FHIR server over HTTPS this is the internal dns name of the Web Gateway container.
- Supported grant types: The grant types supported by the OAuth2 Authorization Server
- Authorization Code
- Client Credentials
- JWT Authorization
- NOTE : We will use the Client Credentials grant type to authenticate the FHIR server to the OAuth2 Authorization Server.
- SSL/TLS Configuration: The SSL/TLS configuration to use for the OAuth2 Authorization Server
- Default : BFC_SSL
4.2. Scope Tab
Next we move to the Scope tab.
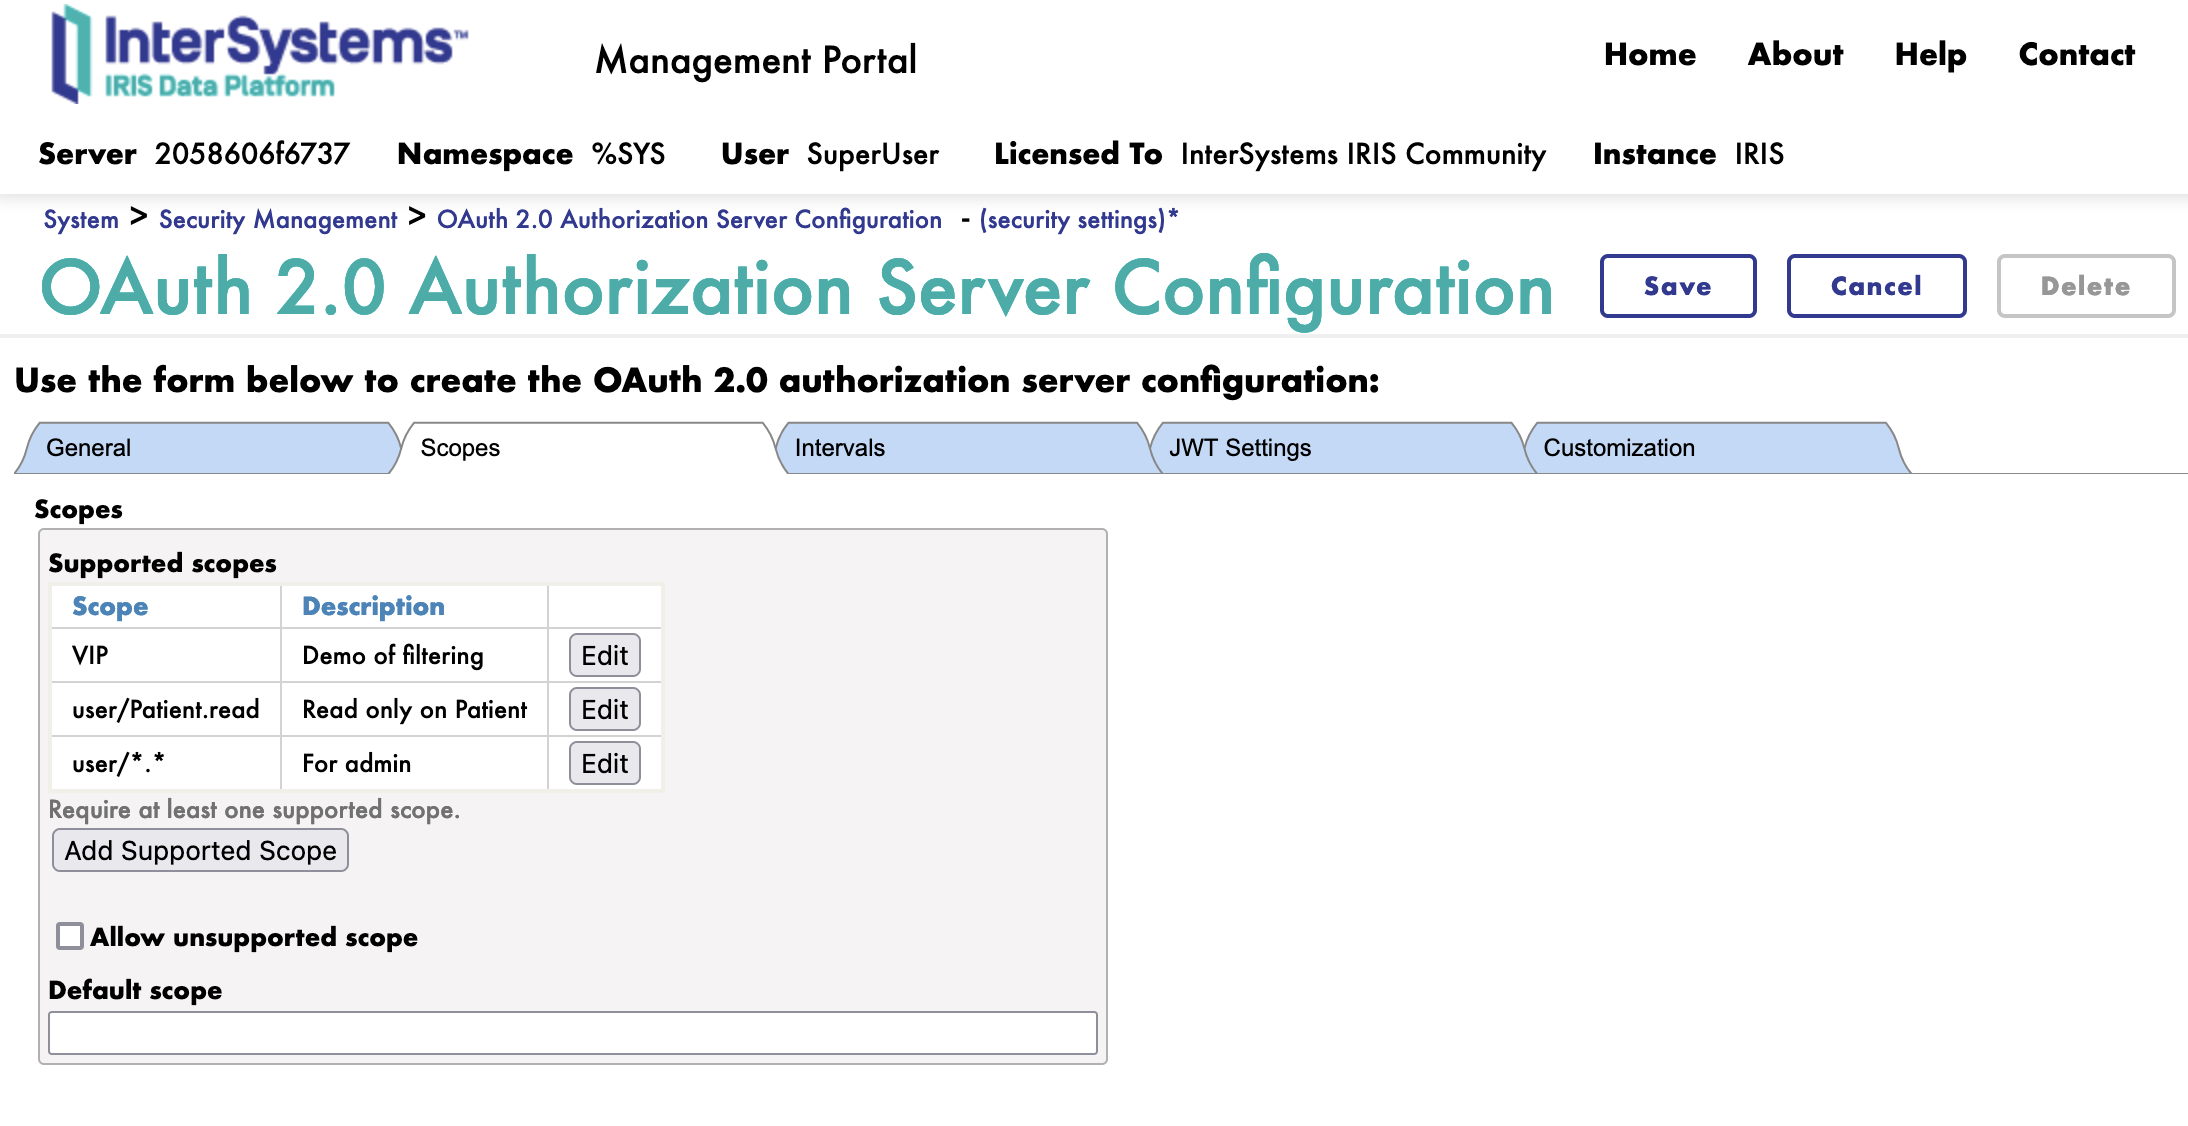
We will create 3 scopes:
- user/Patient.read: The scope to read patient resources
- VIP: The scope to read VIP patient resources
- user/.: The scope to read all resources, for administrative purposes
4.3. JWT Tab
Next we move to the JWT tab.
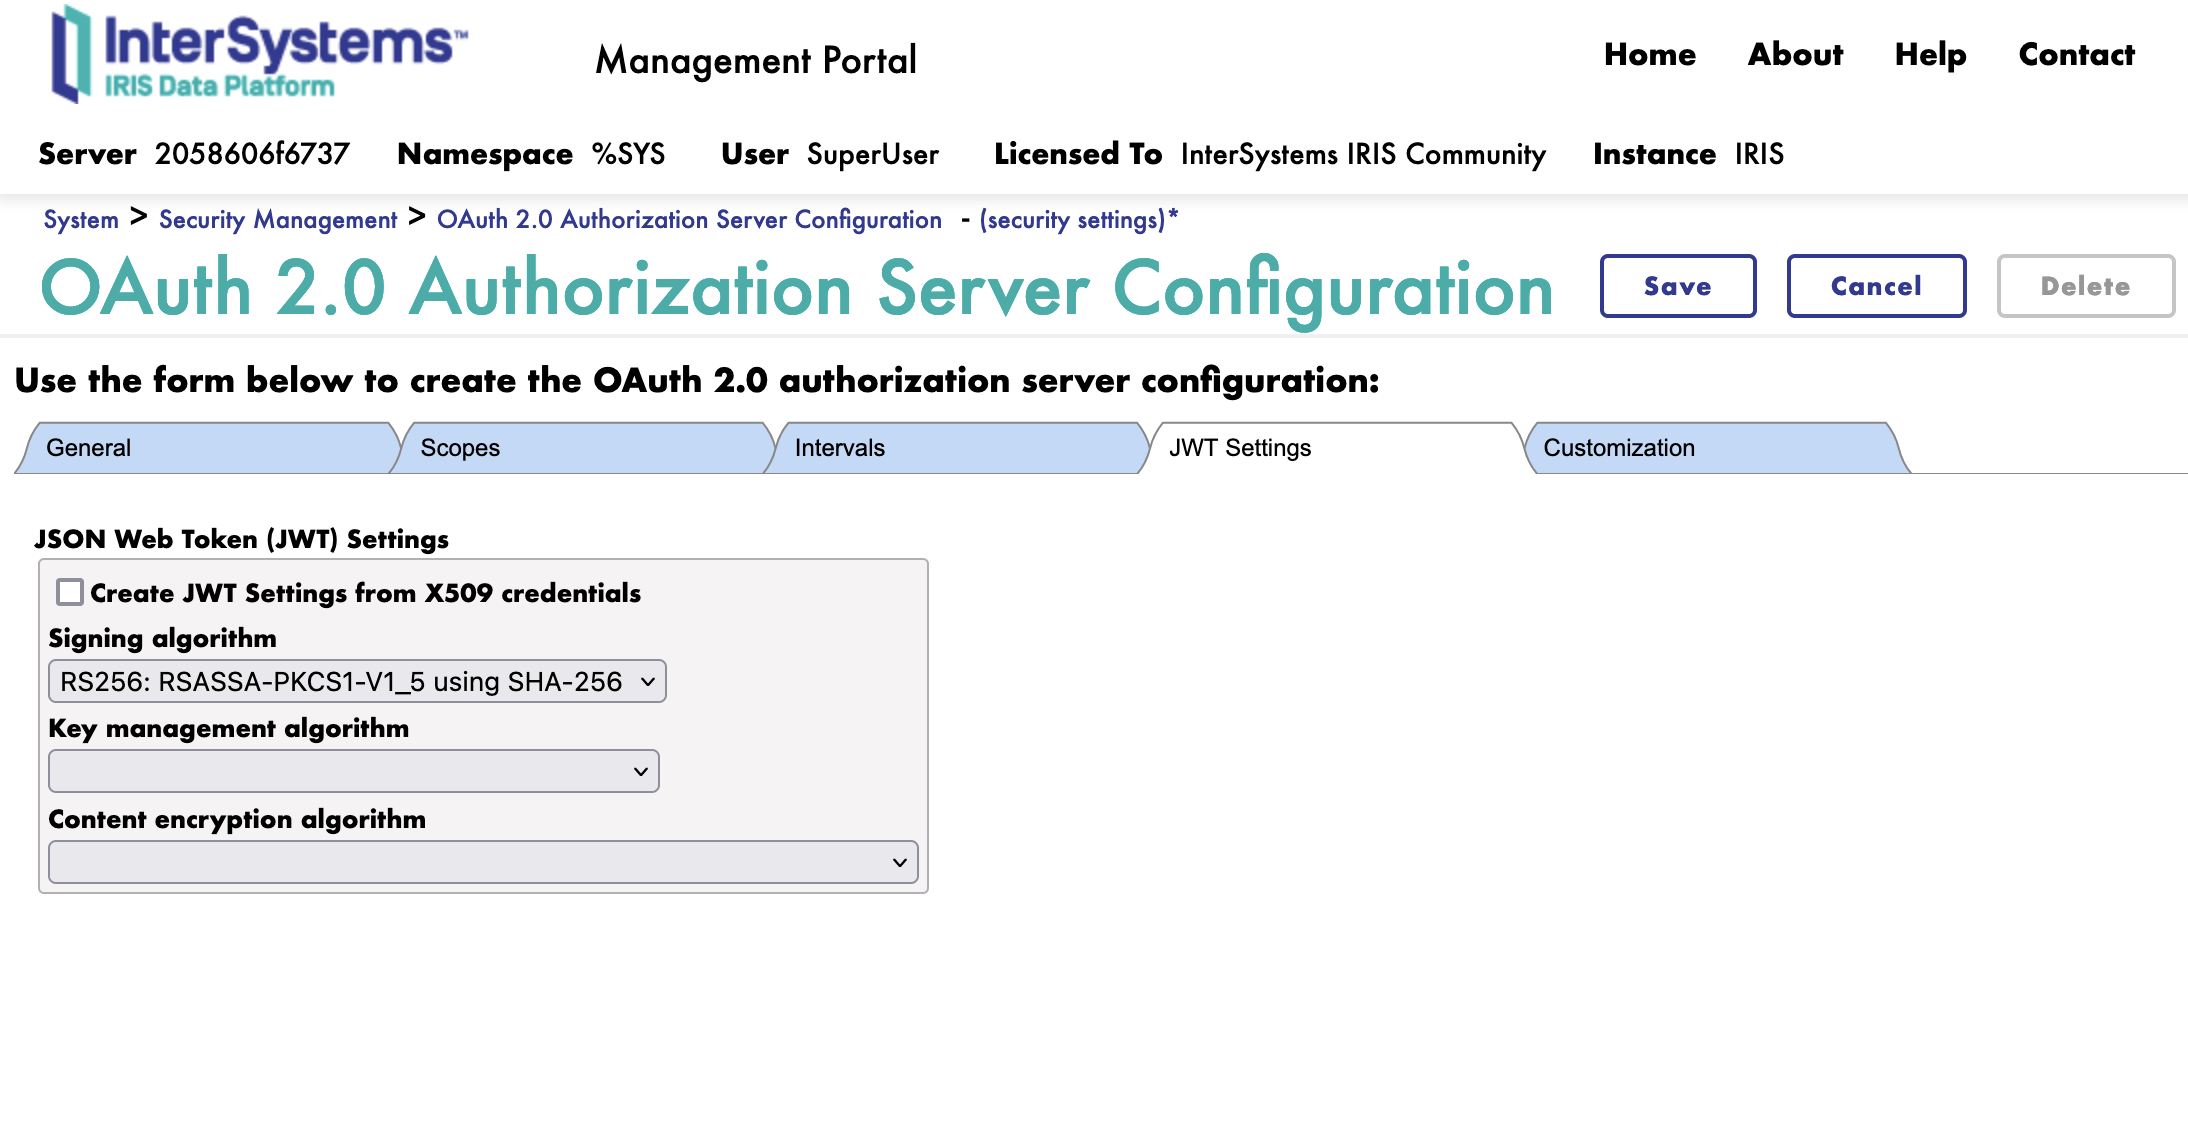
Here we simply select the algorithm to use for the JWT.
We will use the RS256 algorithm.
If needed, we can select encryption for the JWT. We will not use encryption for this training.
4.4. Customization Tab
Next we move to the Customization tab.
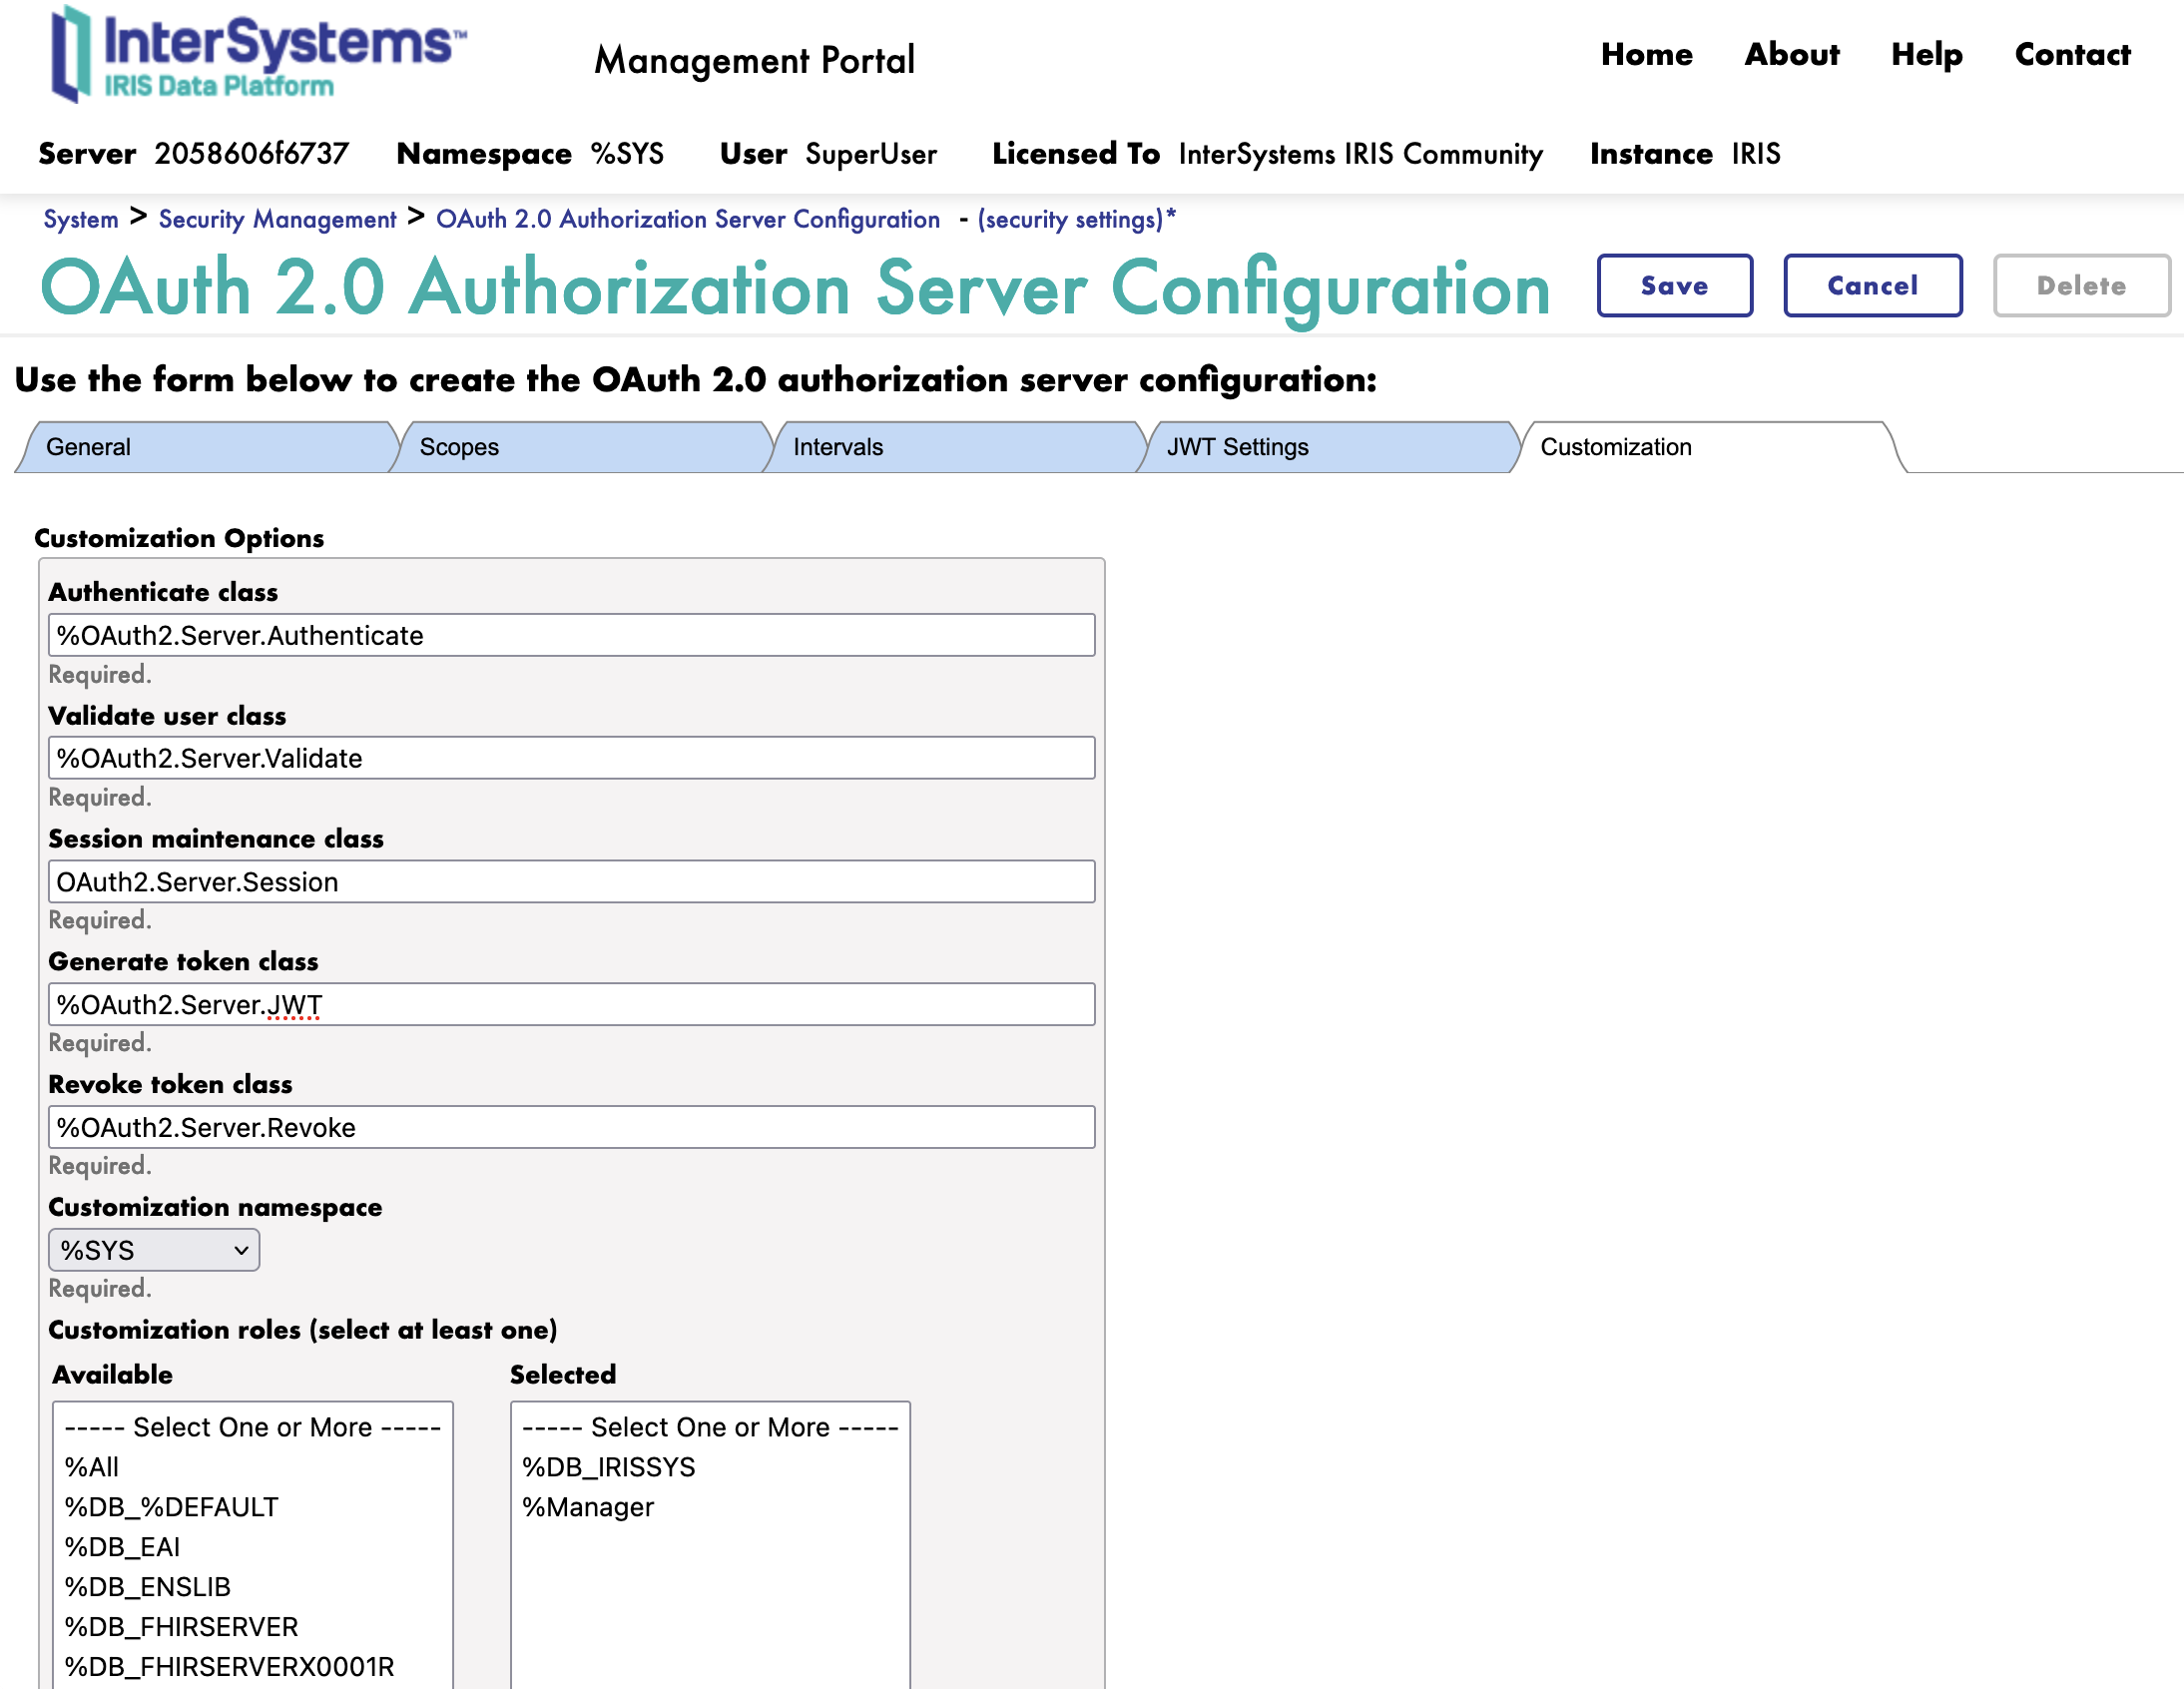
Here is all the customization classes for the OAuth2 Authorization Server.
We change the following classes:
- Generate token class: The class to use to generate the token
- FROM : %OAuth2.Server.Generate
- TO : %OAuth2.Server.JWT
We can now save the OAuth2 Authorization Server.
Great, we have now configured the OAuth2 Authorization Server. 🥳
5. Configuration of the Client
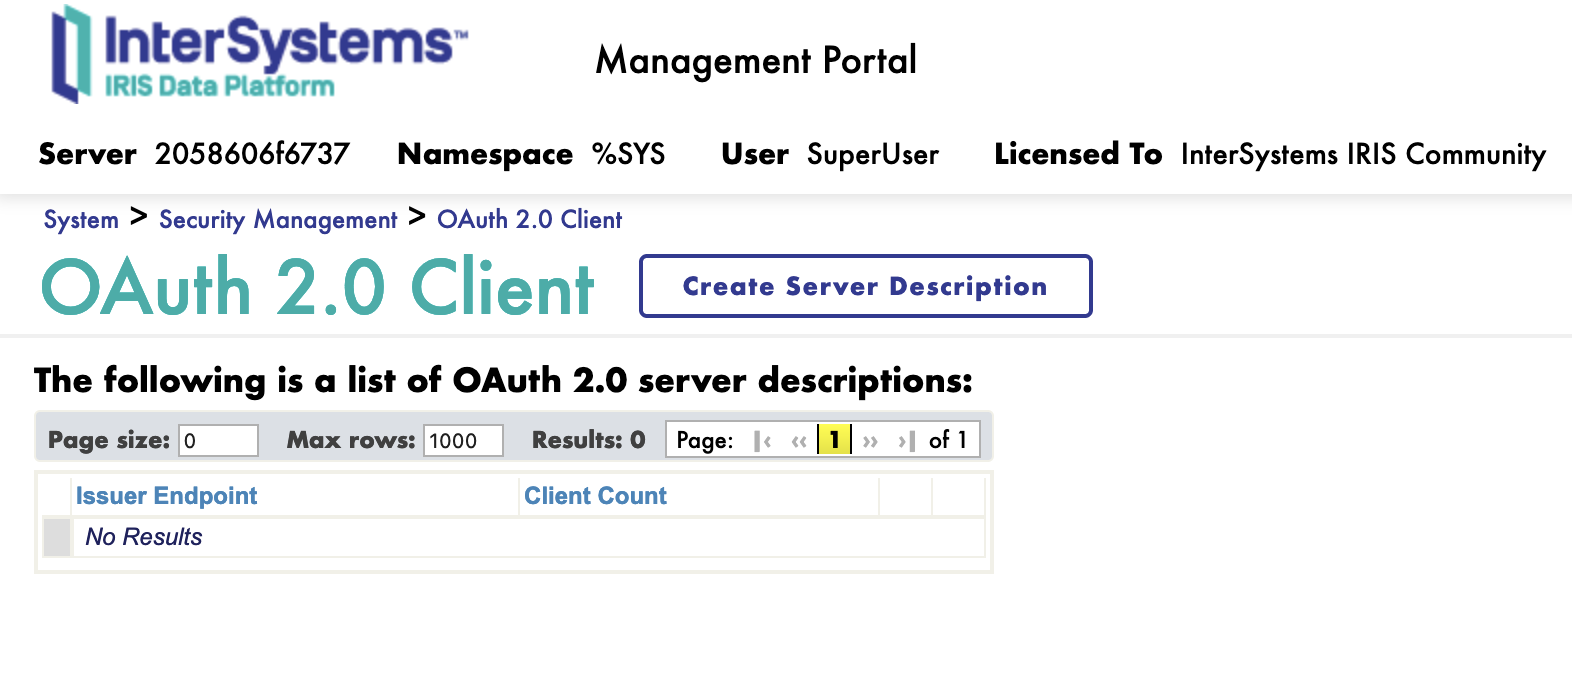
To configure the client, you need to connect to the InterSystems IRIS Management Portal and navigate to the System Administration > Security > OAuth 2.0 > Client.
To create a new client, we need first to register the OAuth2 Authorization Server.
5.1. Register the OAuth2 Authorization Server
On the client page, click on the Create Server Description button.
5.2. Server Description
In the Server Description form, we need to fulfill the following parameters:
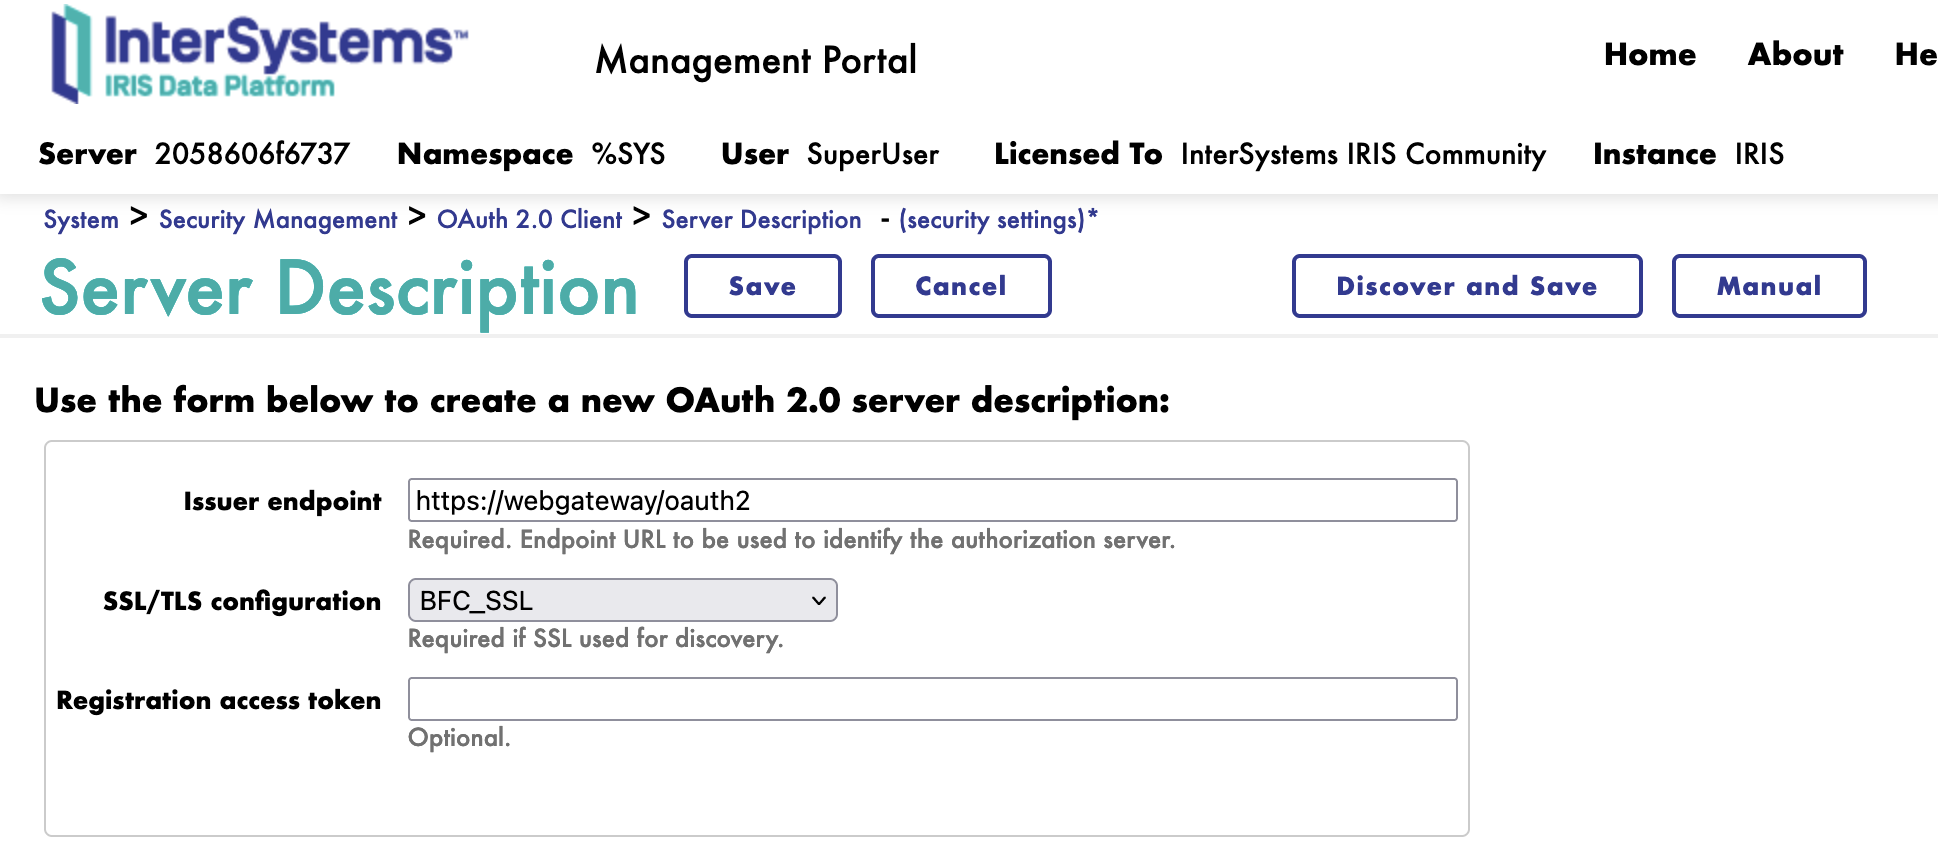
- Server URL: The URL of the OAuth2 Authorization Server
- SSL/TLS Configuration: The SSL/TLS configuration to use for the OAuth2 Authorization Server
- Default : BFC_SSL
Click on the Discover and Save button.
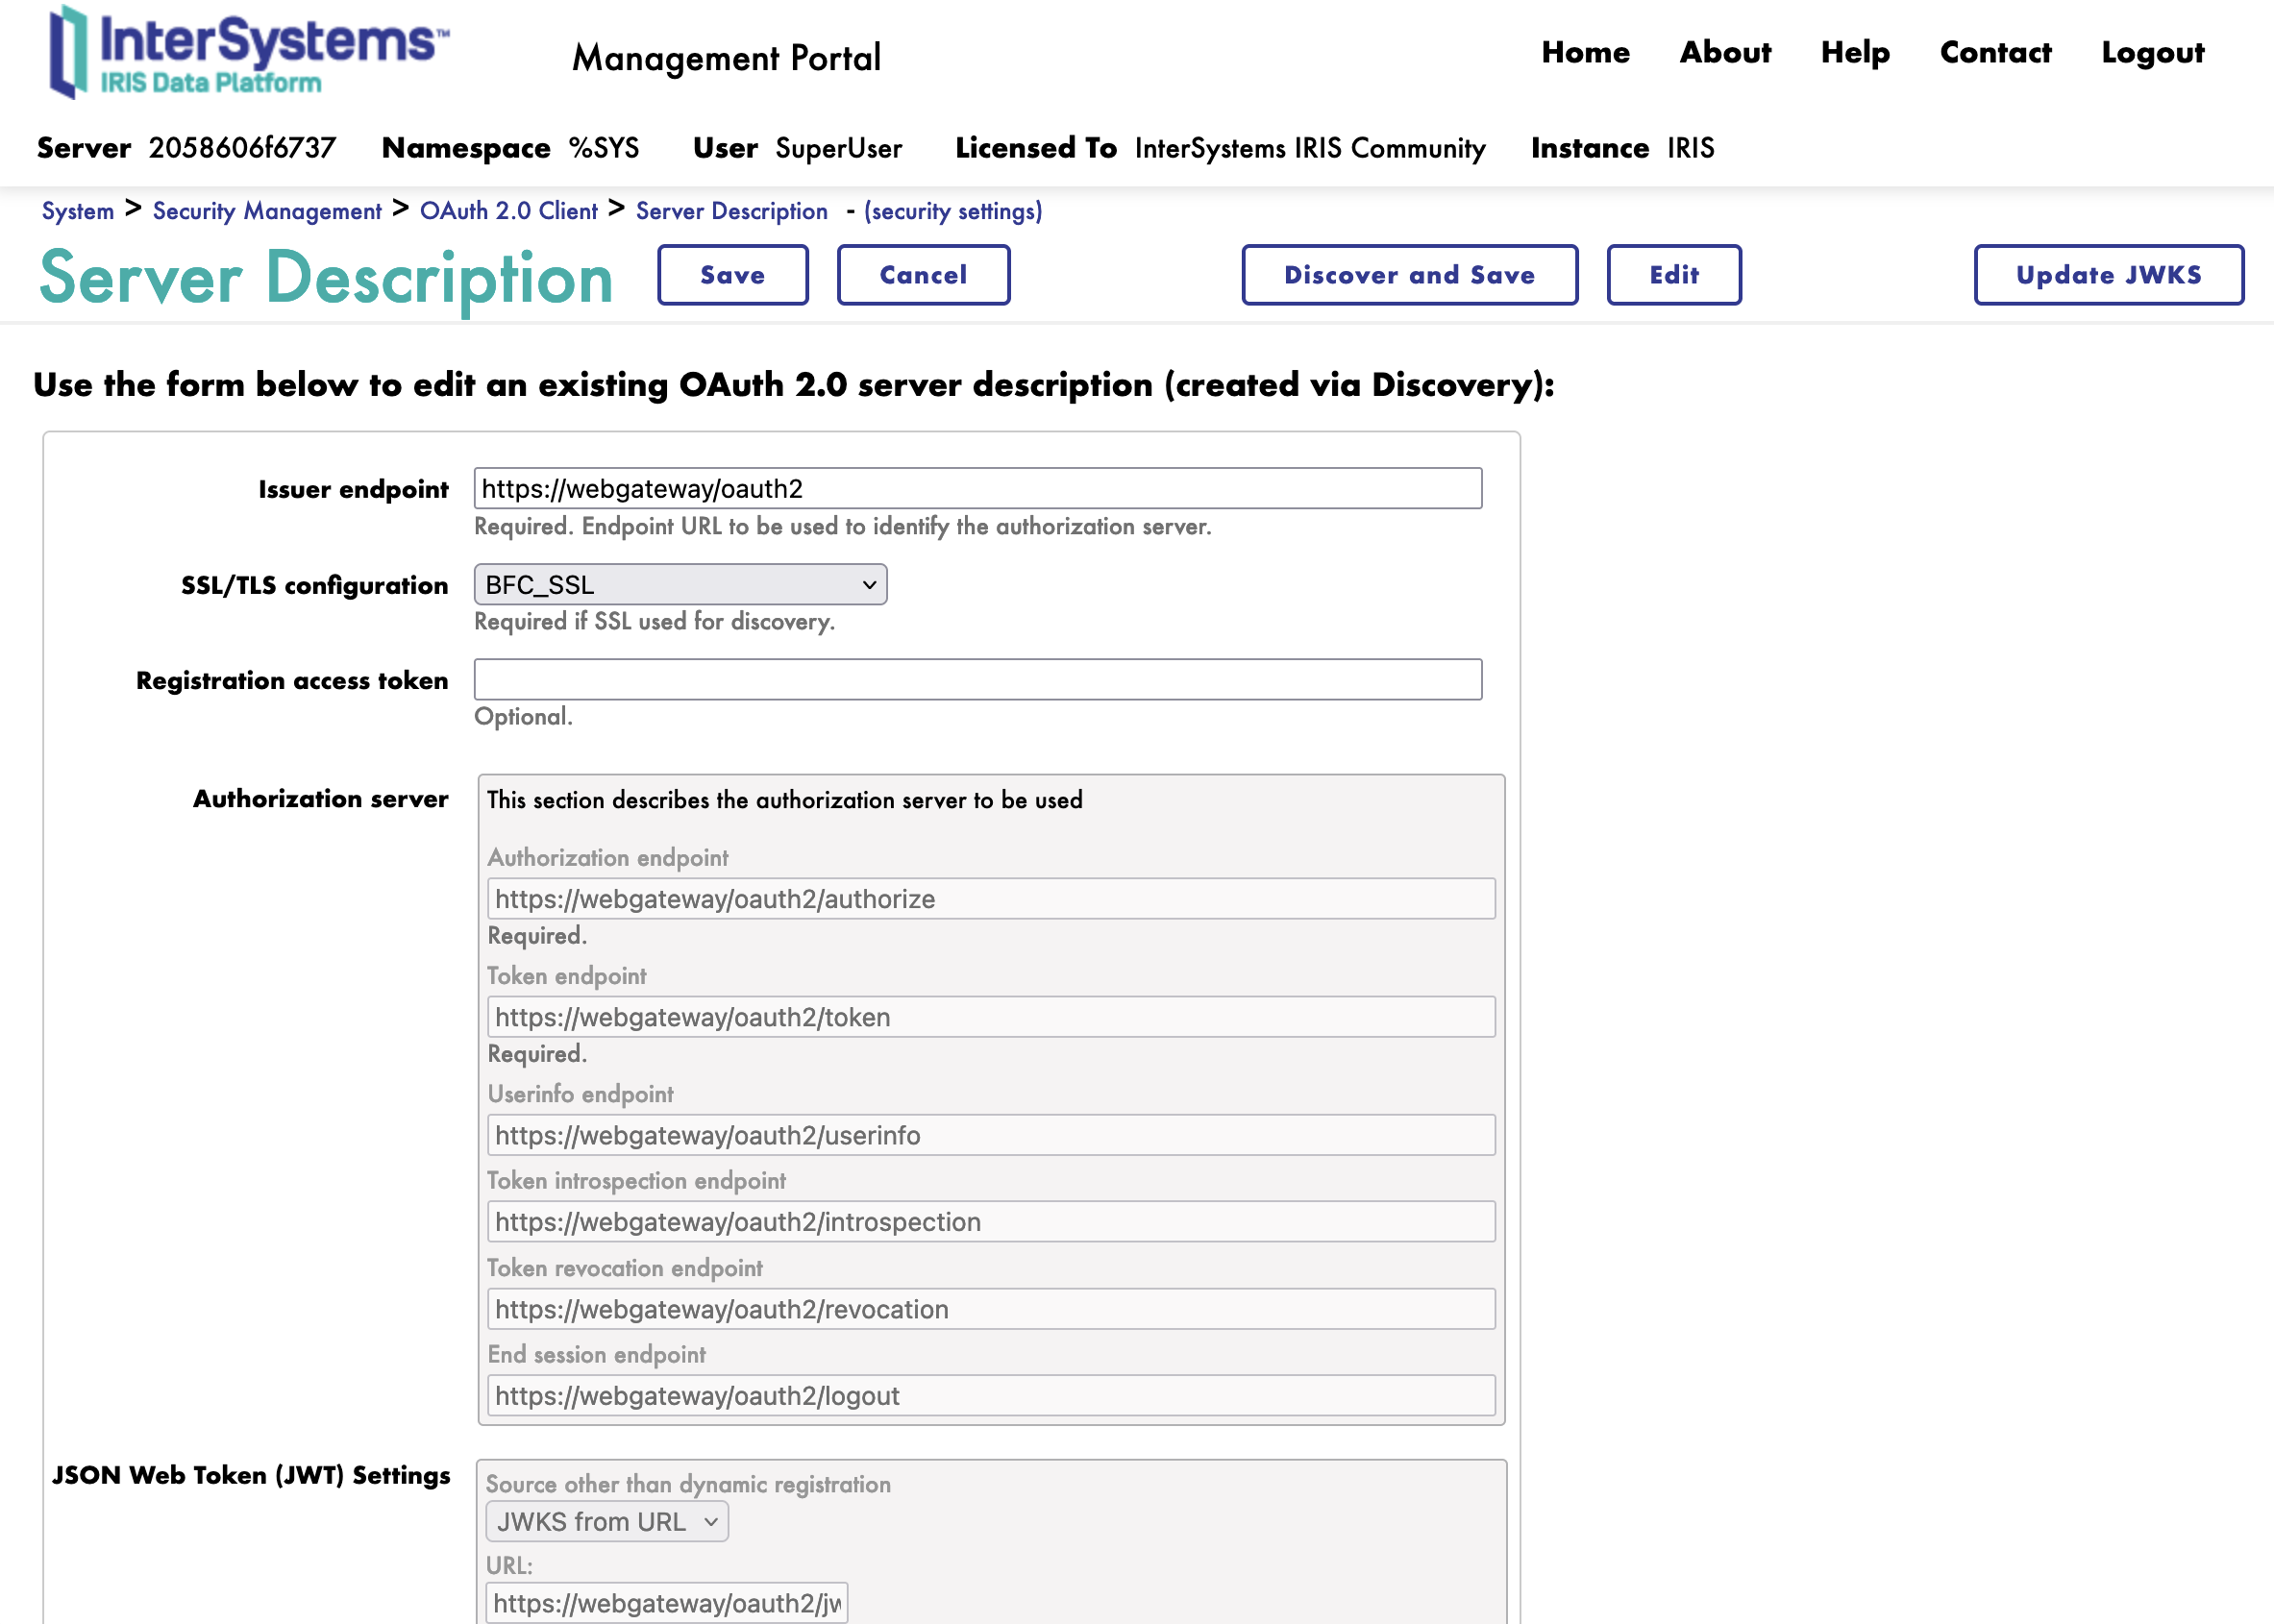
Neat, we have now registered the OAuth2 Authorization Server.
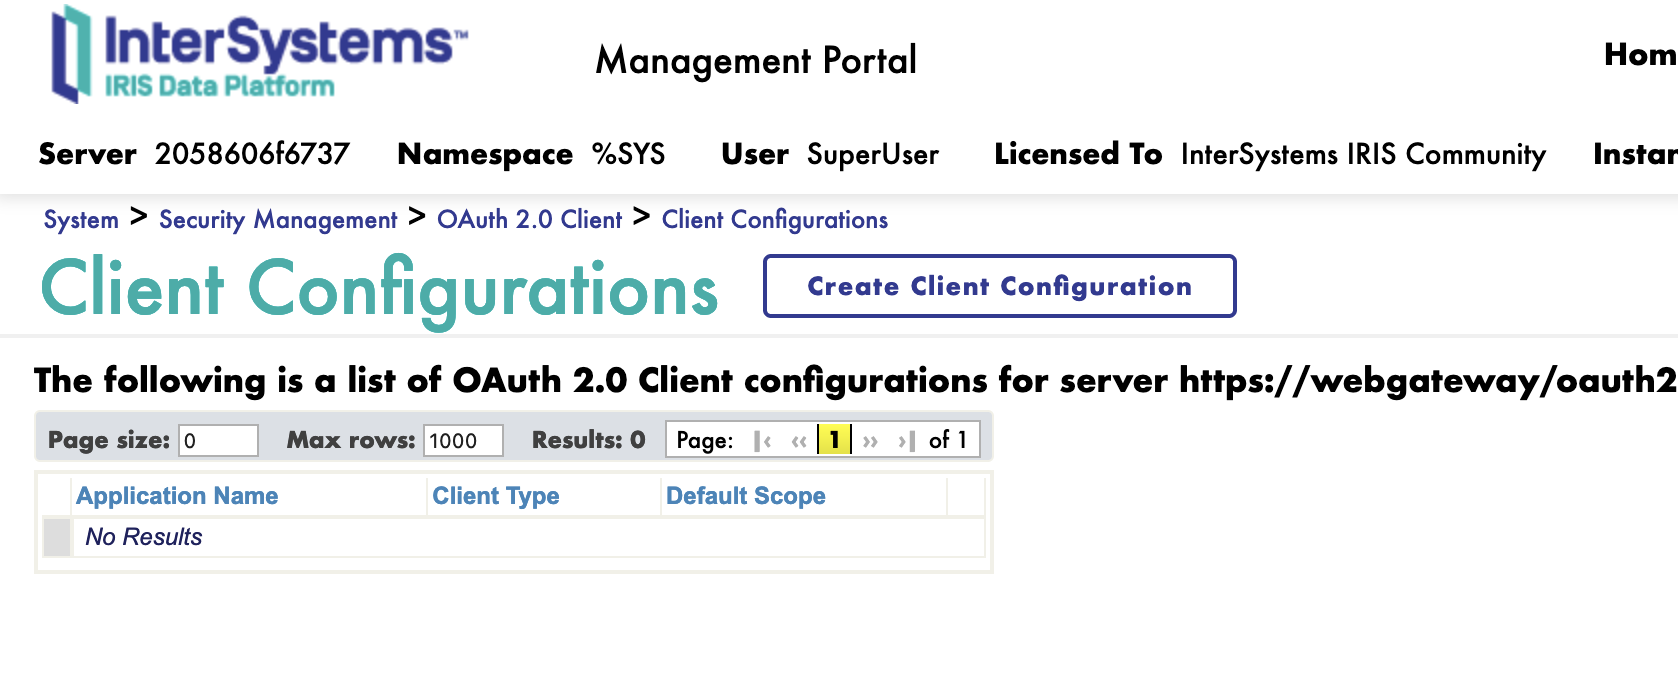
5.3. Create a new client
Next, we can create a new client.
On the client page, we have a new button Client Configuration.

Click on the Client Configuration button link to the Server Description.
We can now Create a new client.
5.3.1. General Tab
First we start with the General tab.
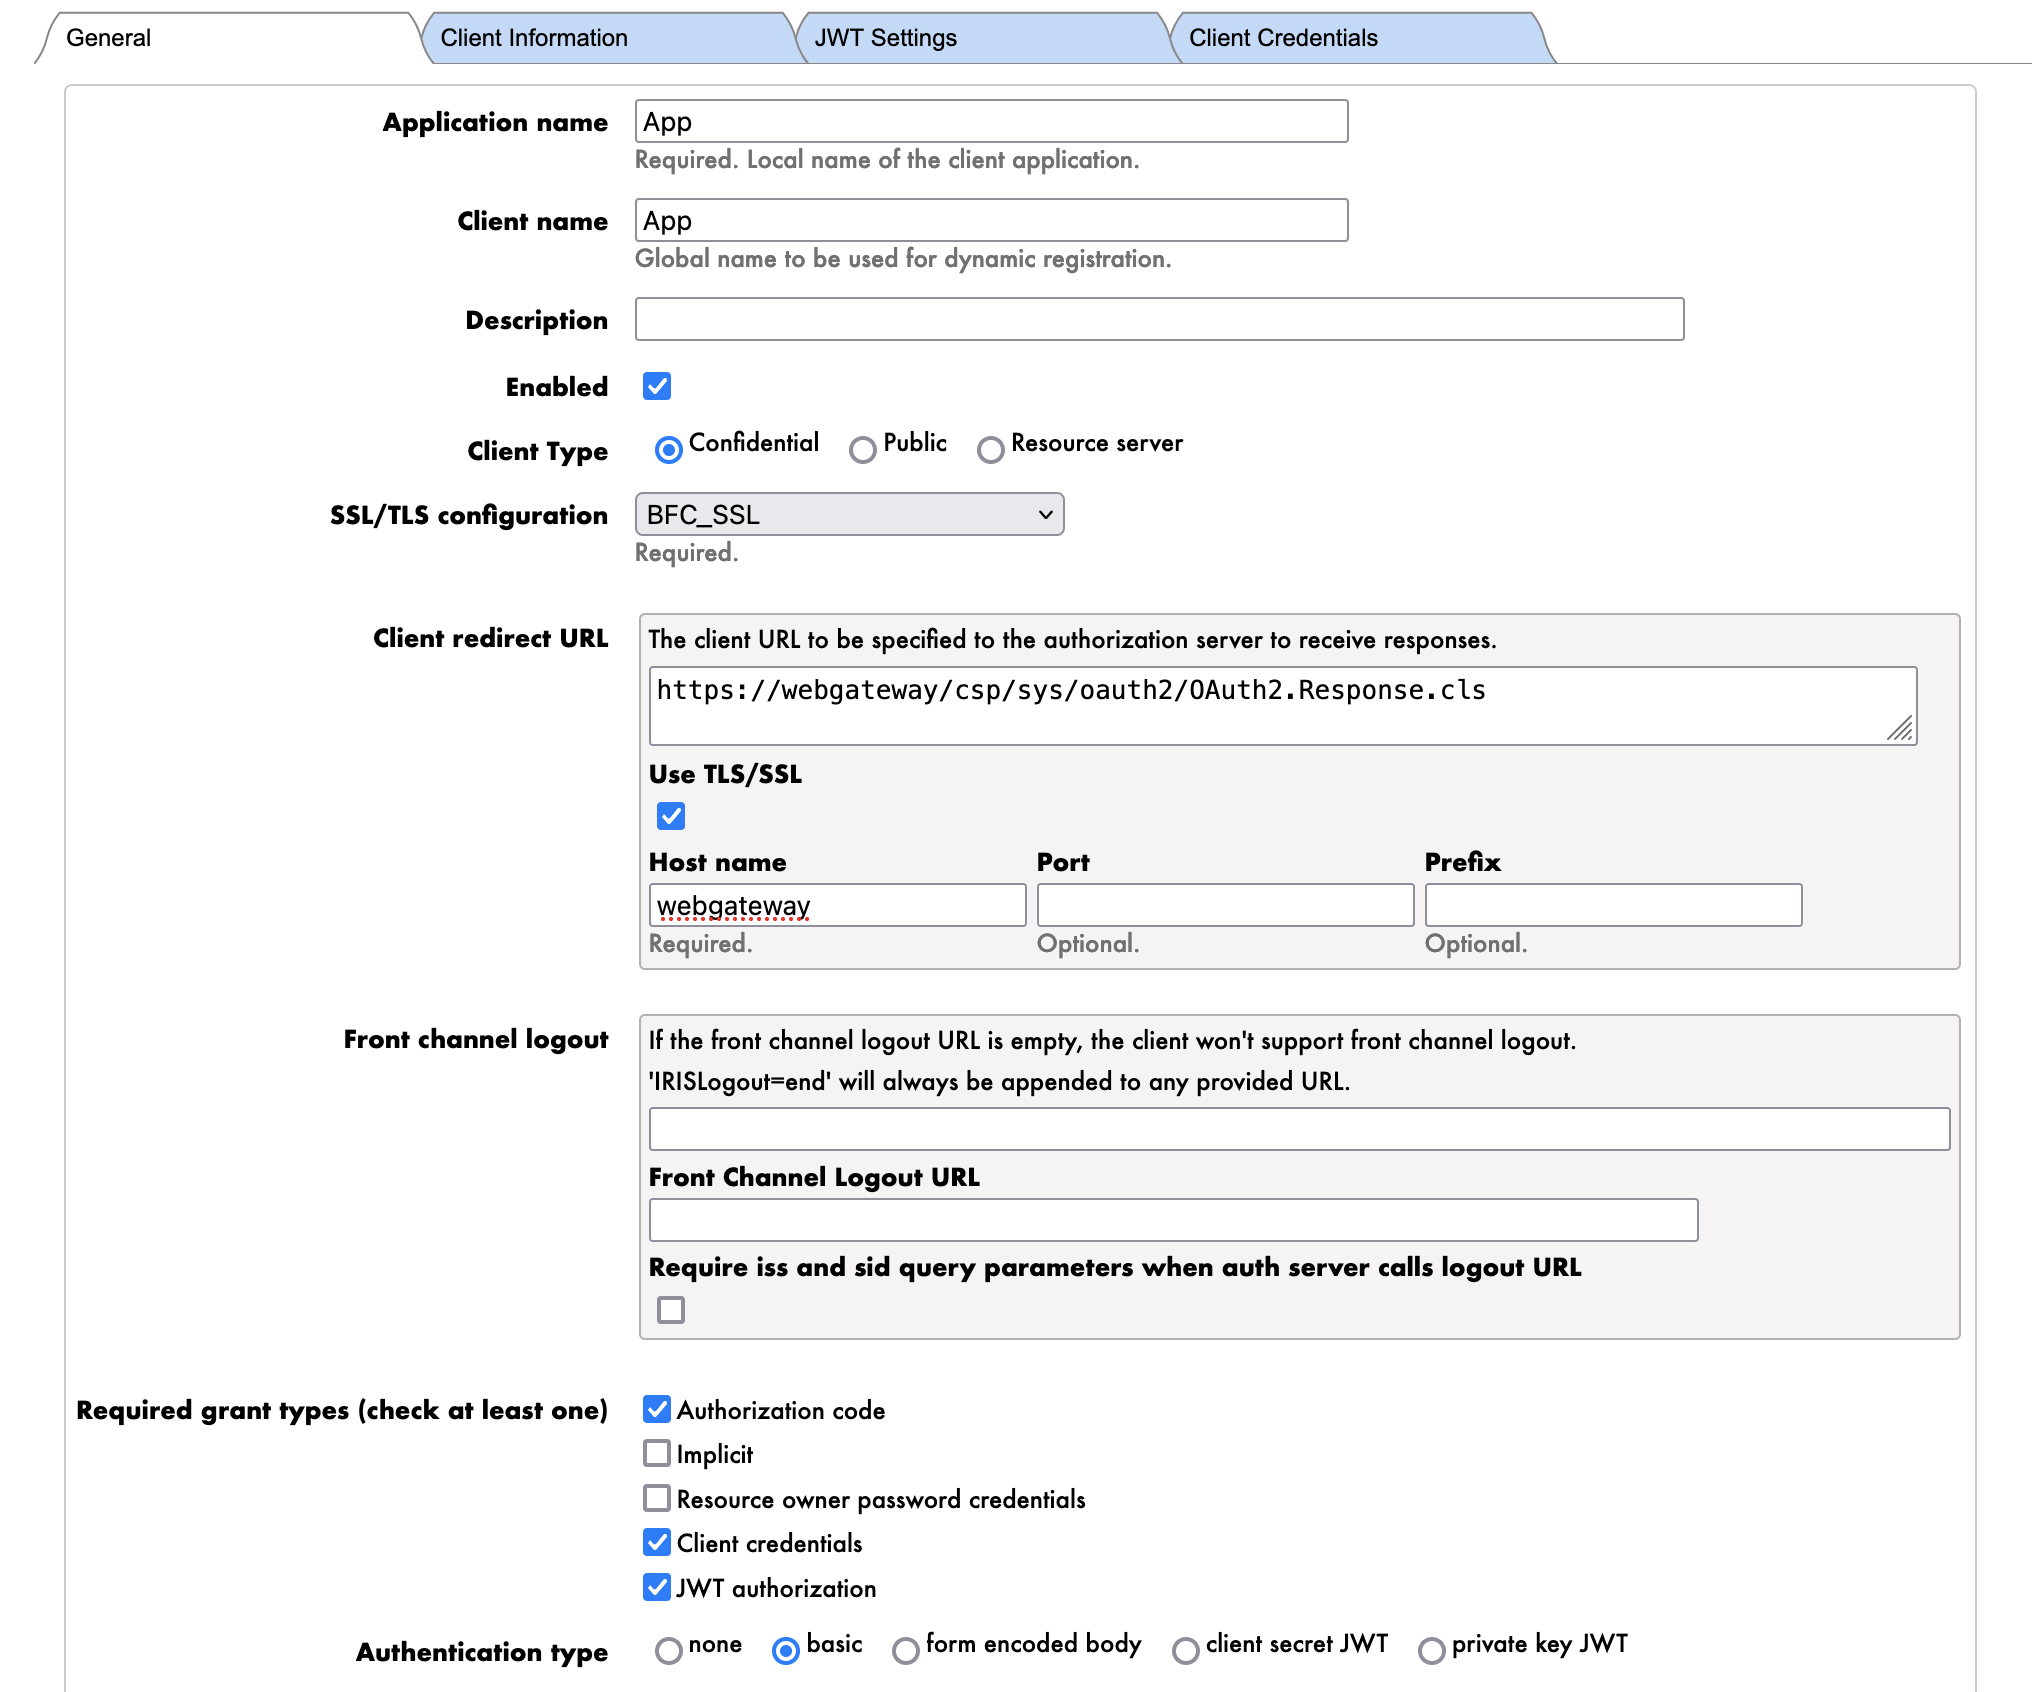
The parameters are as follows:
- Application Name: The name of the client
- App
- NOTE : This is the name of the client.
- Client Name: The name of the client
- App
- Client Type: The type of the client
- Confidential
- NOTE : We will use the confidential client type to authenticate the FHIR server to the OAuth2 Authorization Server.
- Redirect URI: The redirect URI of the client
- https://webgateway/oauth2
- NOTE : Here we use the URL of the Web Gateway to expose the FHIR server over HTTPS this is the internal dns name of the Web Gateway container.
- NOTE : This will not be used in this training.
- Grant Types: The grant types supported by the client
- Client Credentials
- NOTE : We will use the Client Credentials grant type to authenticate the Client Application to the OAuth2 Authorization Server.
- Authentication Type: The authentication type of the client
- Basic
- NOTE : We will use the Basic authentication type to authenticate the Client Application to the OAuth2 Authorization Server.
Now we can click the Dynamic Registration button.
Congratulations, we have now created the client. 🥳
If we go to the Client Credentials tab, we can see the client credentials.
Notice that the client credentials are the Client ID and the Client Secret.
6. Configuration of the FHIR server
⚠️ WARNING ⚠️ : Make sure to be on the FHIRSERVER namespace.
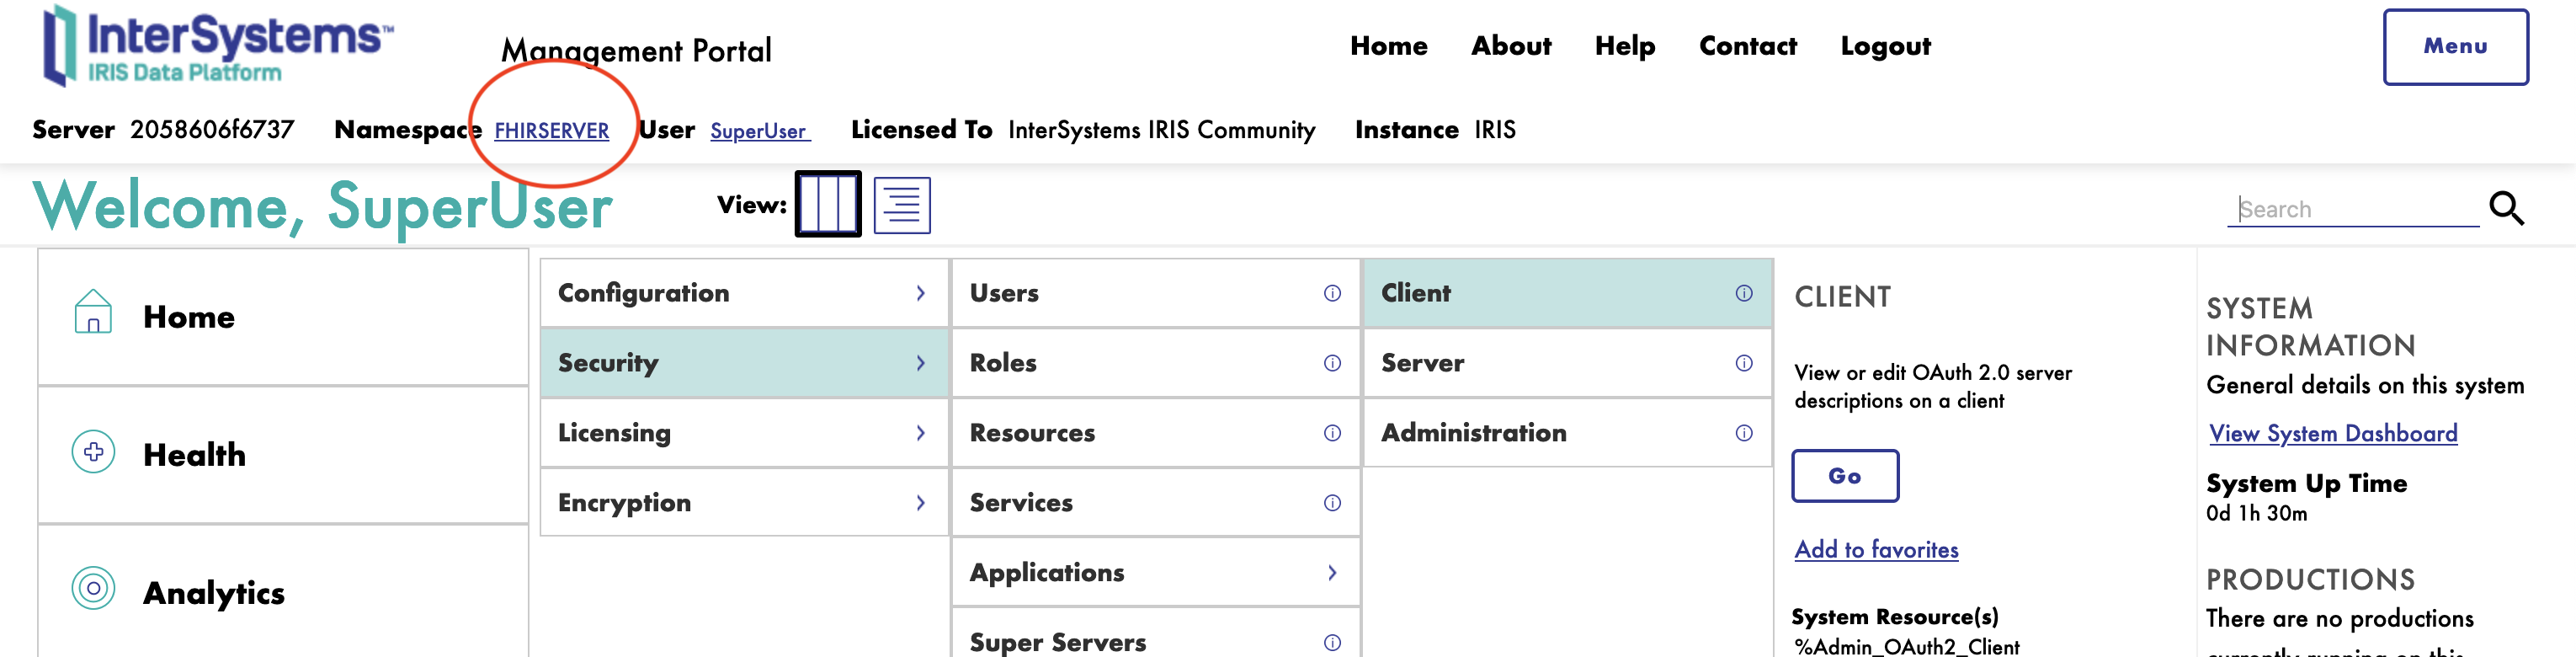
To configure the FHIR server, you need to connect to the InterSystems IRIS Management Portal and navigate to the Health > FHIR Configuration > Servers.
Next, we will create a new FHIR server.
Click on the Server Configuration button.
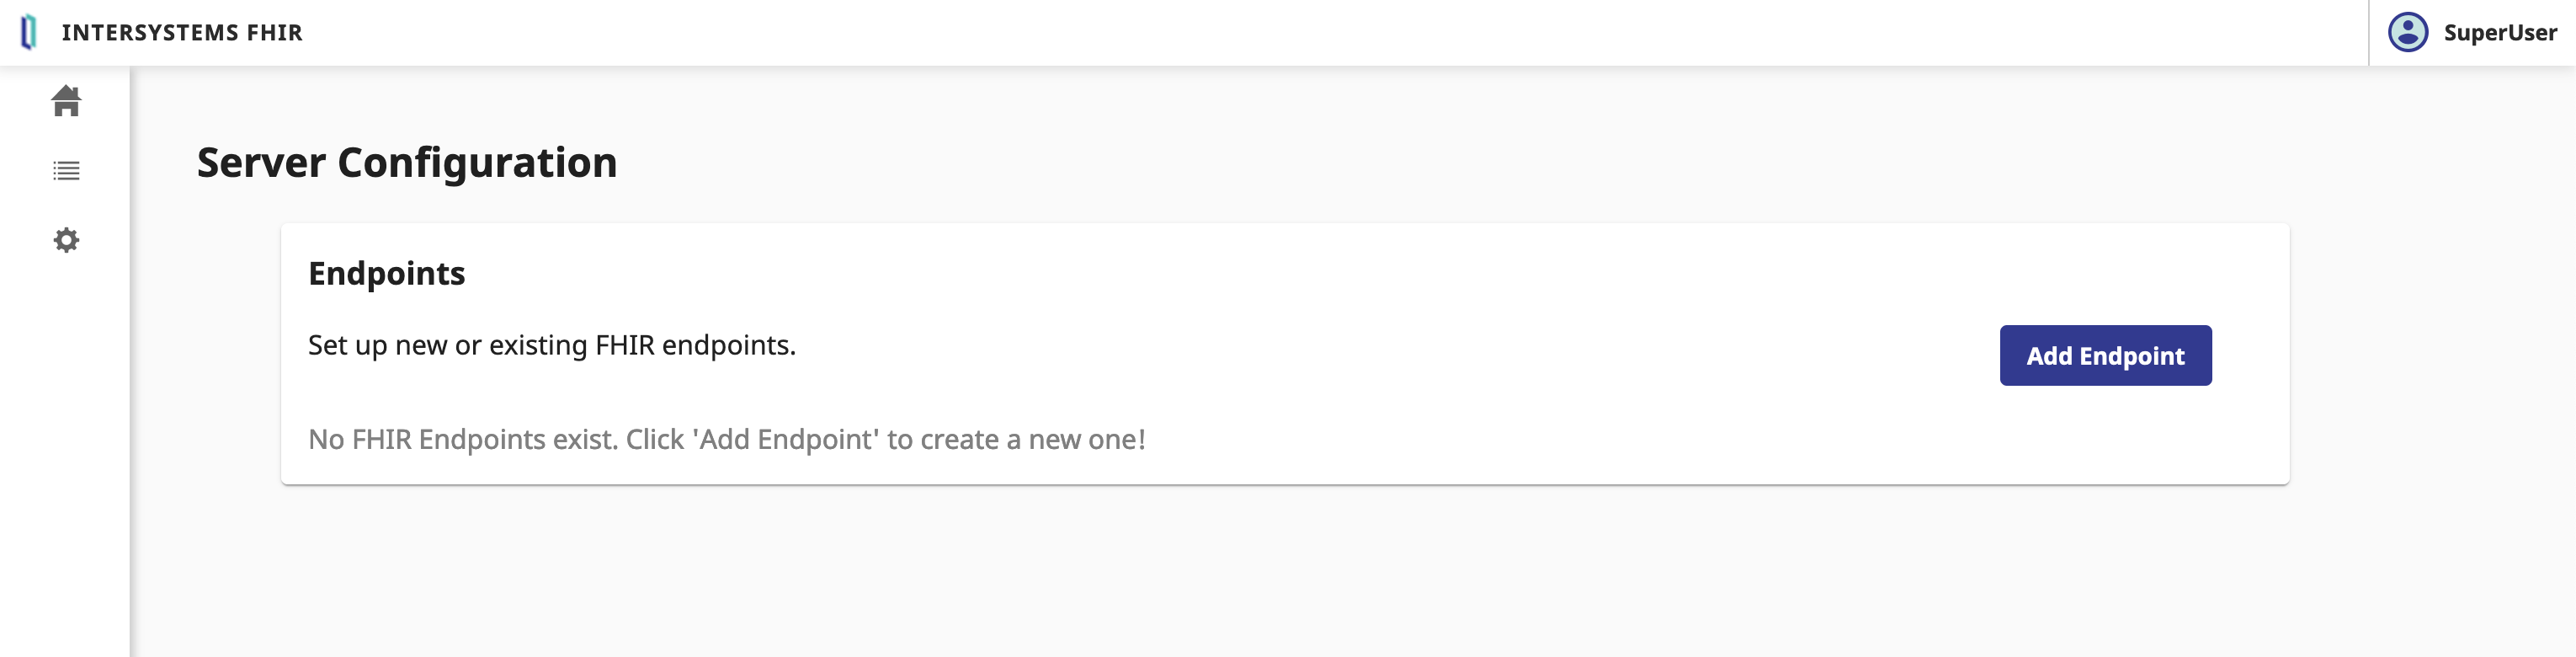
6.1. Create a new FHIR server
In the Server Configuration form, we need to fulfill the following parameters:
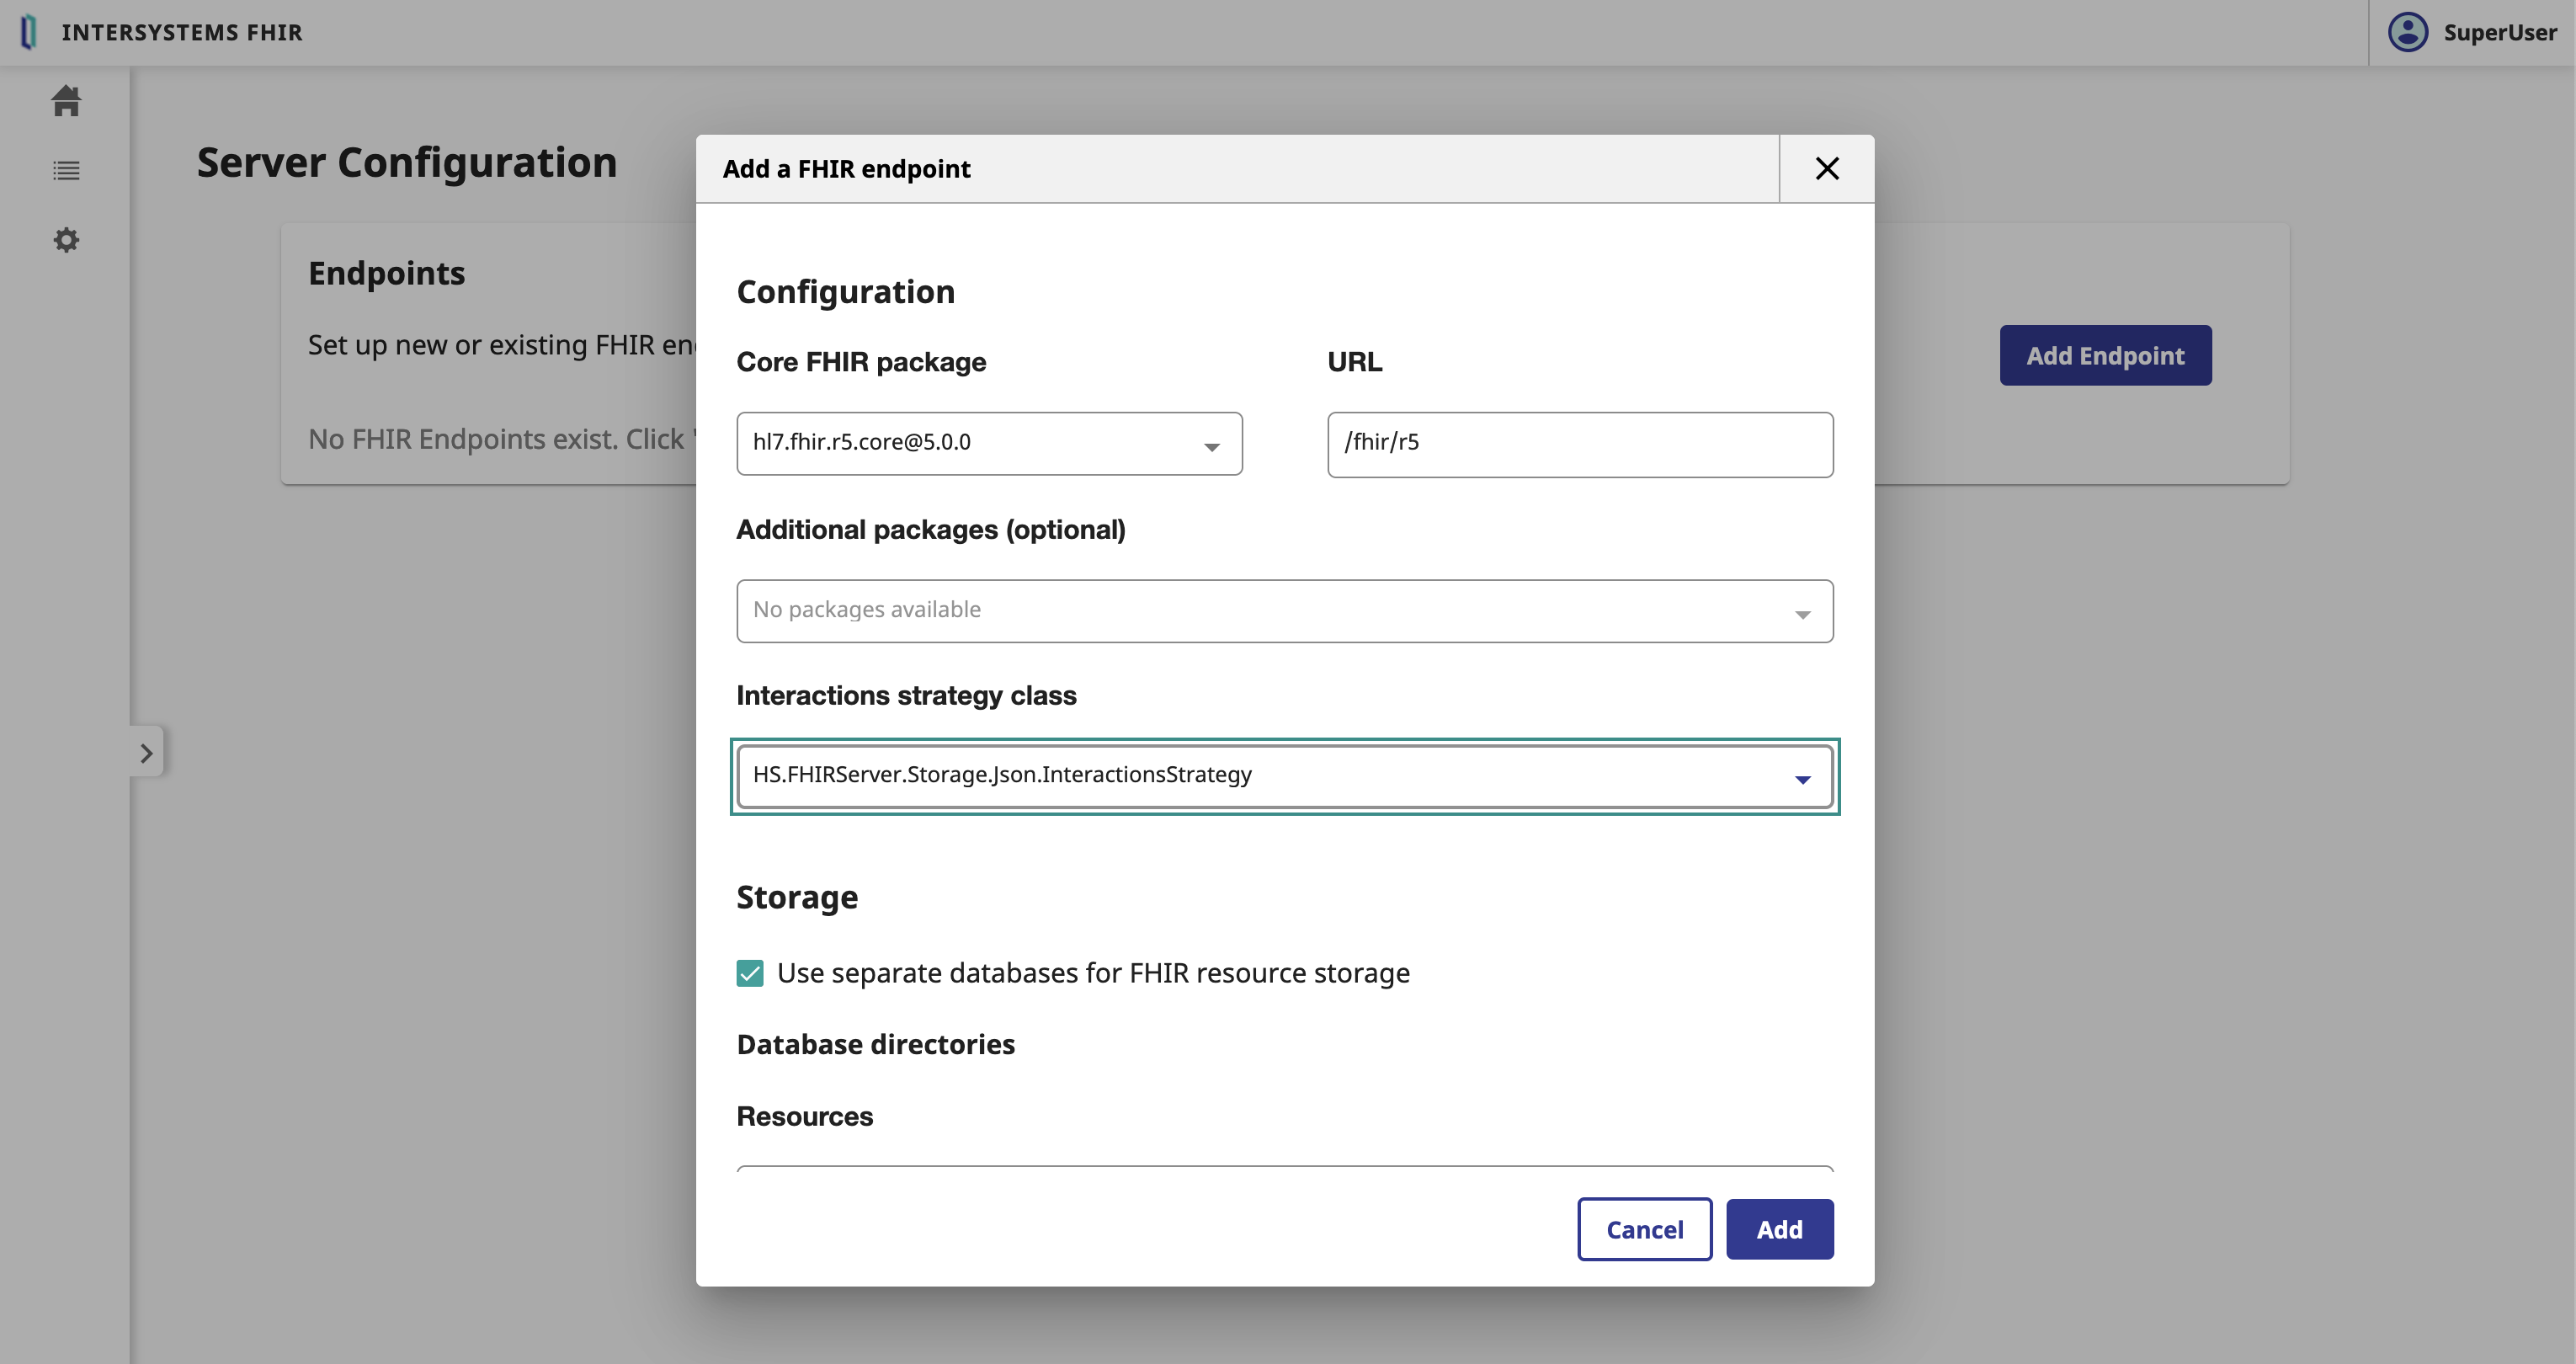
- Core FHIR Package: The core FHIR package to use for the FHIR server
- r5
- URL: The URL of the FHIR server
- /fhir/r5
- Interactions strategy: The interactions strategy to use for the FHIR server
- FHIR.Python.InteractionsStrategy
- ⚠️ WARNING ⚠️ : Not like in the picutre, we need to select the
FHIR.Python.InteractionsStrategyinteractions strategy.
Click on the Add button.
This can take a few minutes. 🕒 Let's go grabe a coffee. ☕️
Great, we have now created the FHIR server. 🥳
6.2. Bind the FHIR server to the OAuth2 Authorization Server
Select the FHIR server and scroll down to the Edit button.
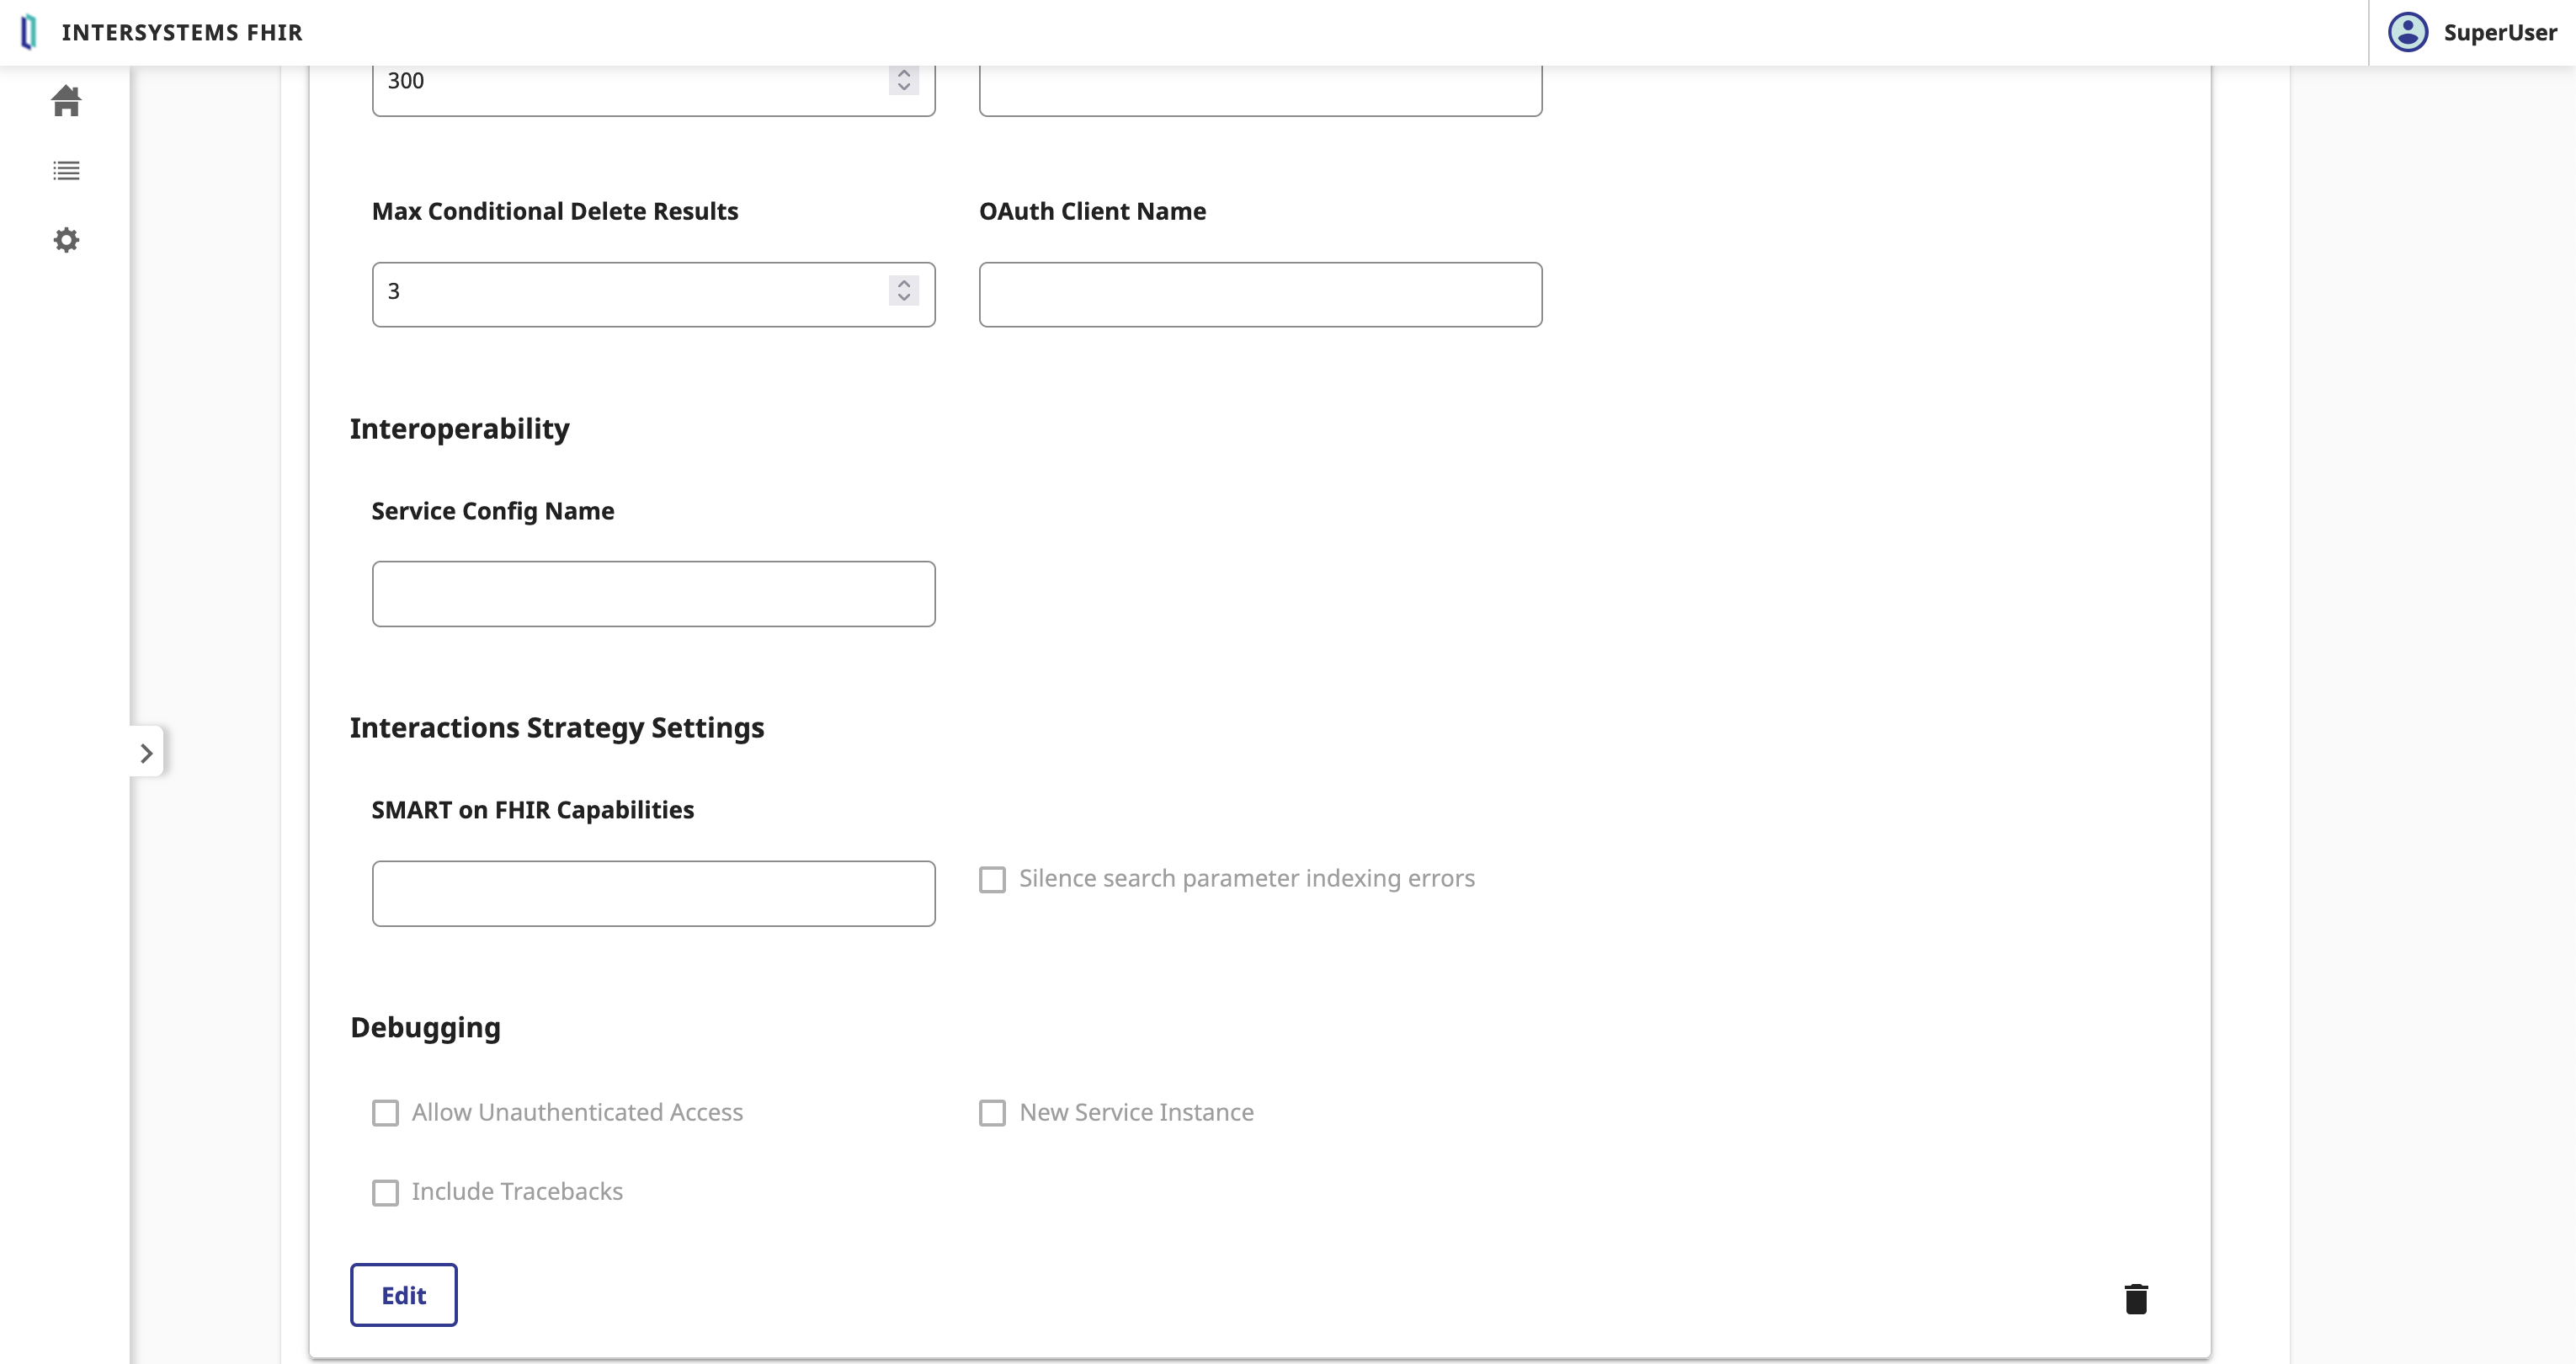
In the FHIR Server form, we need to fulfill the following parameters:
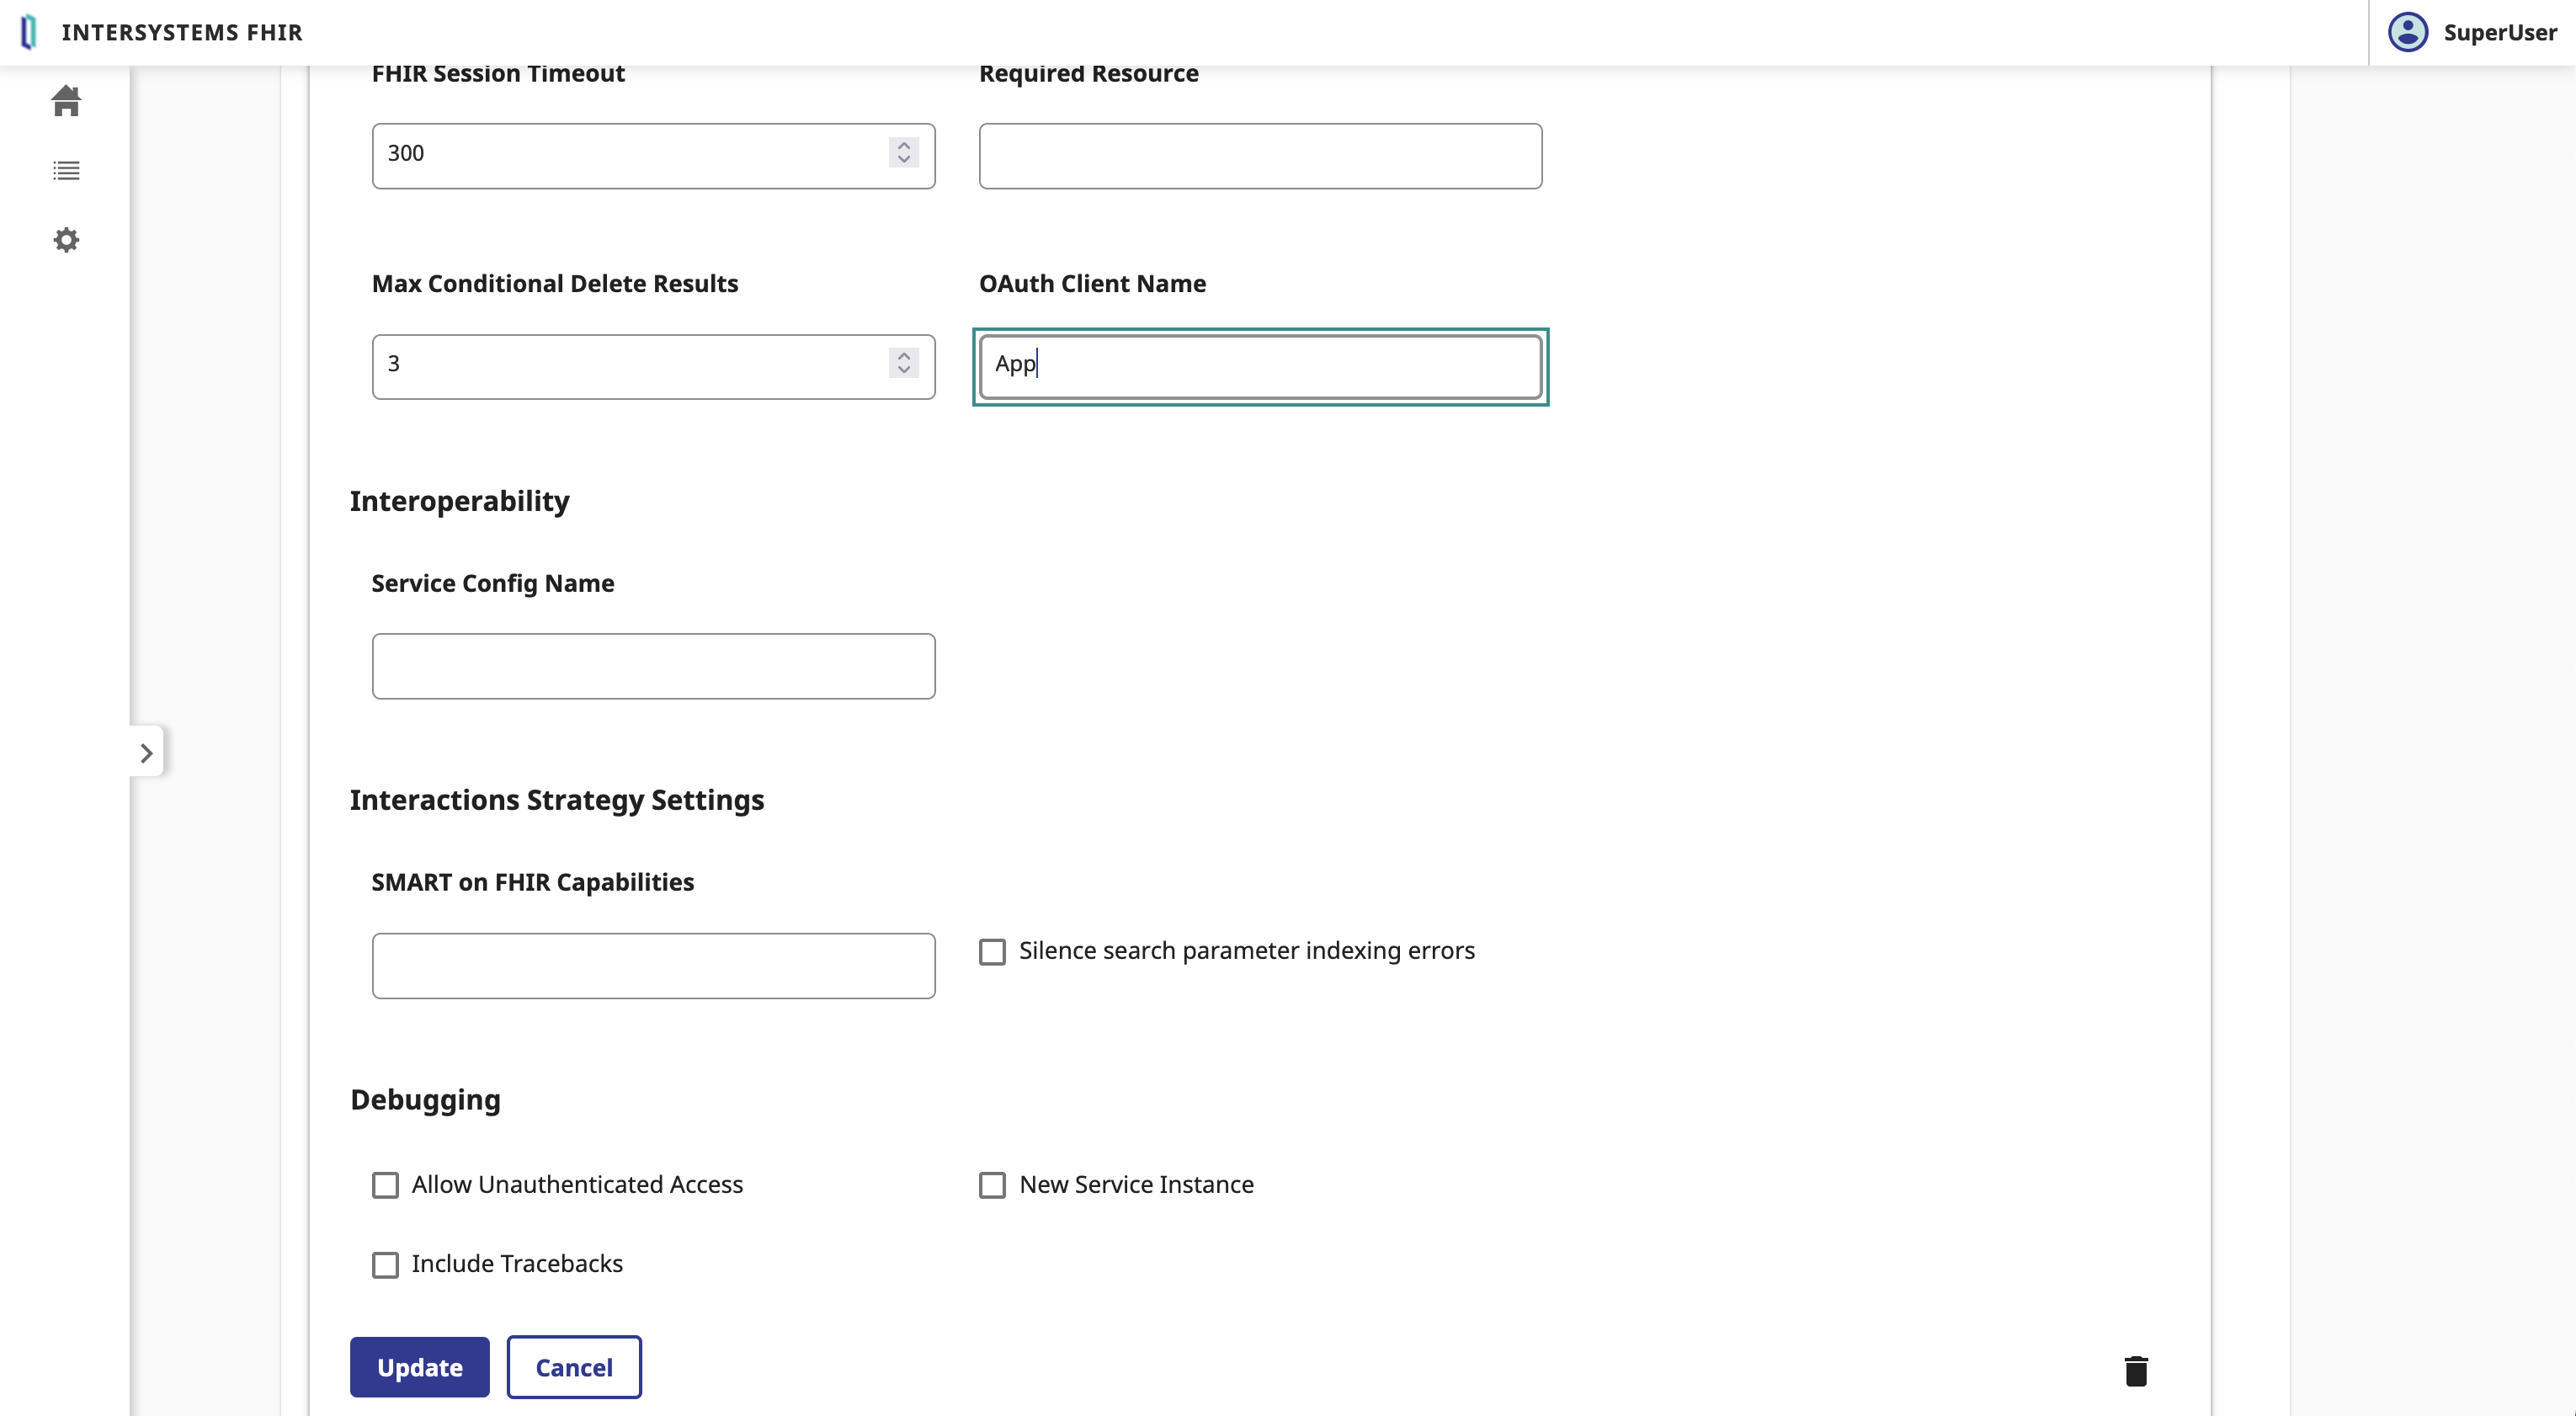
- OAuth2 Client Name: The name of the client
- App
Click on the Save button.
Great, we have now bind the FHIR server to the OAuth2 Authorization Server. 🥳
6.3. Test the FHIR server
To test the FHIR server, you can use the following command:
GET https://localhost:4443/fhir/r5/Patient
Without the Authorization header, you will get a 401 Unauthorized response.
To authenticate the request, you need to add the Authorization header with the Bearer token.
For that let's claim a token from the OAuth2 Authorization Server.
POST https://localhost:4443/oauth2/token
Content-Type: application/x-www-form-urlencoded
Authorization: Basic <client_id>:<client_secret>

grant_type=client_credentials&scope=user/Patient.read&aud=https://localhost:4443/fhir/r5
You will get a 200 OK response with the access_token and the token_type.
Now you can use the access_token to authenticate the request to the FHIR server.
GET https://localhost:4443/fhir/r5/Patient
Authorization: Bearer <access_token>
Accept: application/fhir+json
Great, you have now authenticated the request to the FHIR server. 🥳
7. Filter FHIR Resources with InterSystems IRIS for Health
Ok, we now start a big topic.
The whole point of this topic will be to put in between the FHIR server and the client application the interoperability capabilities of IRIS for Health.
Here is a macro view of the architecture:
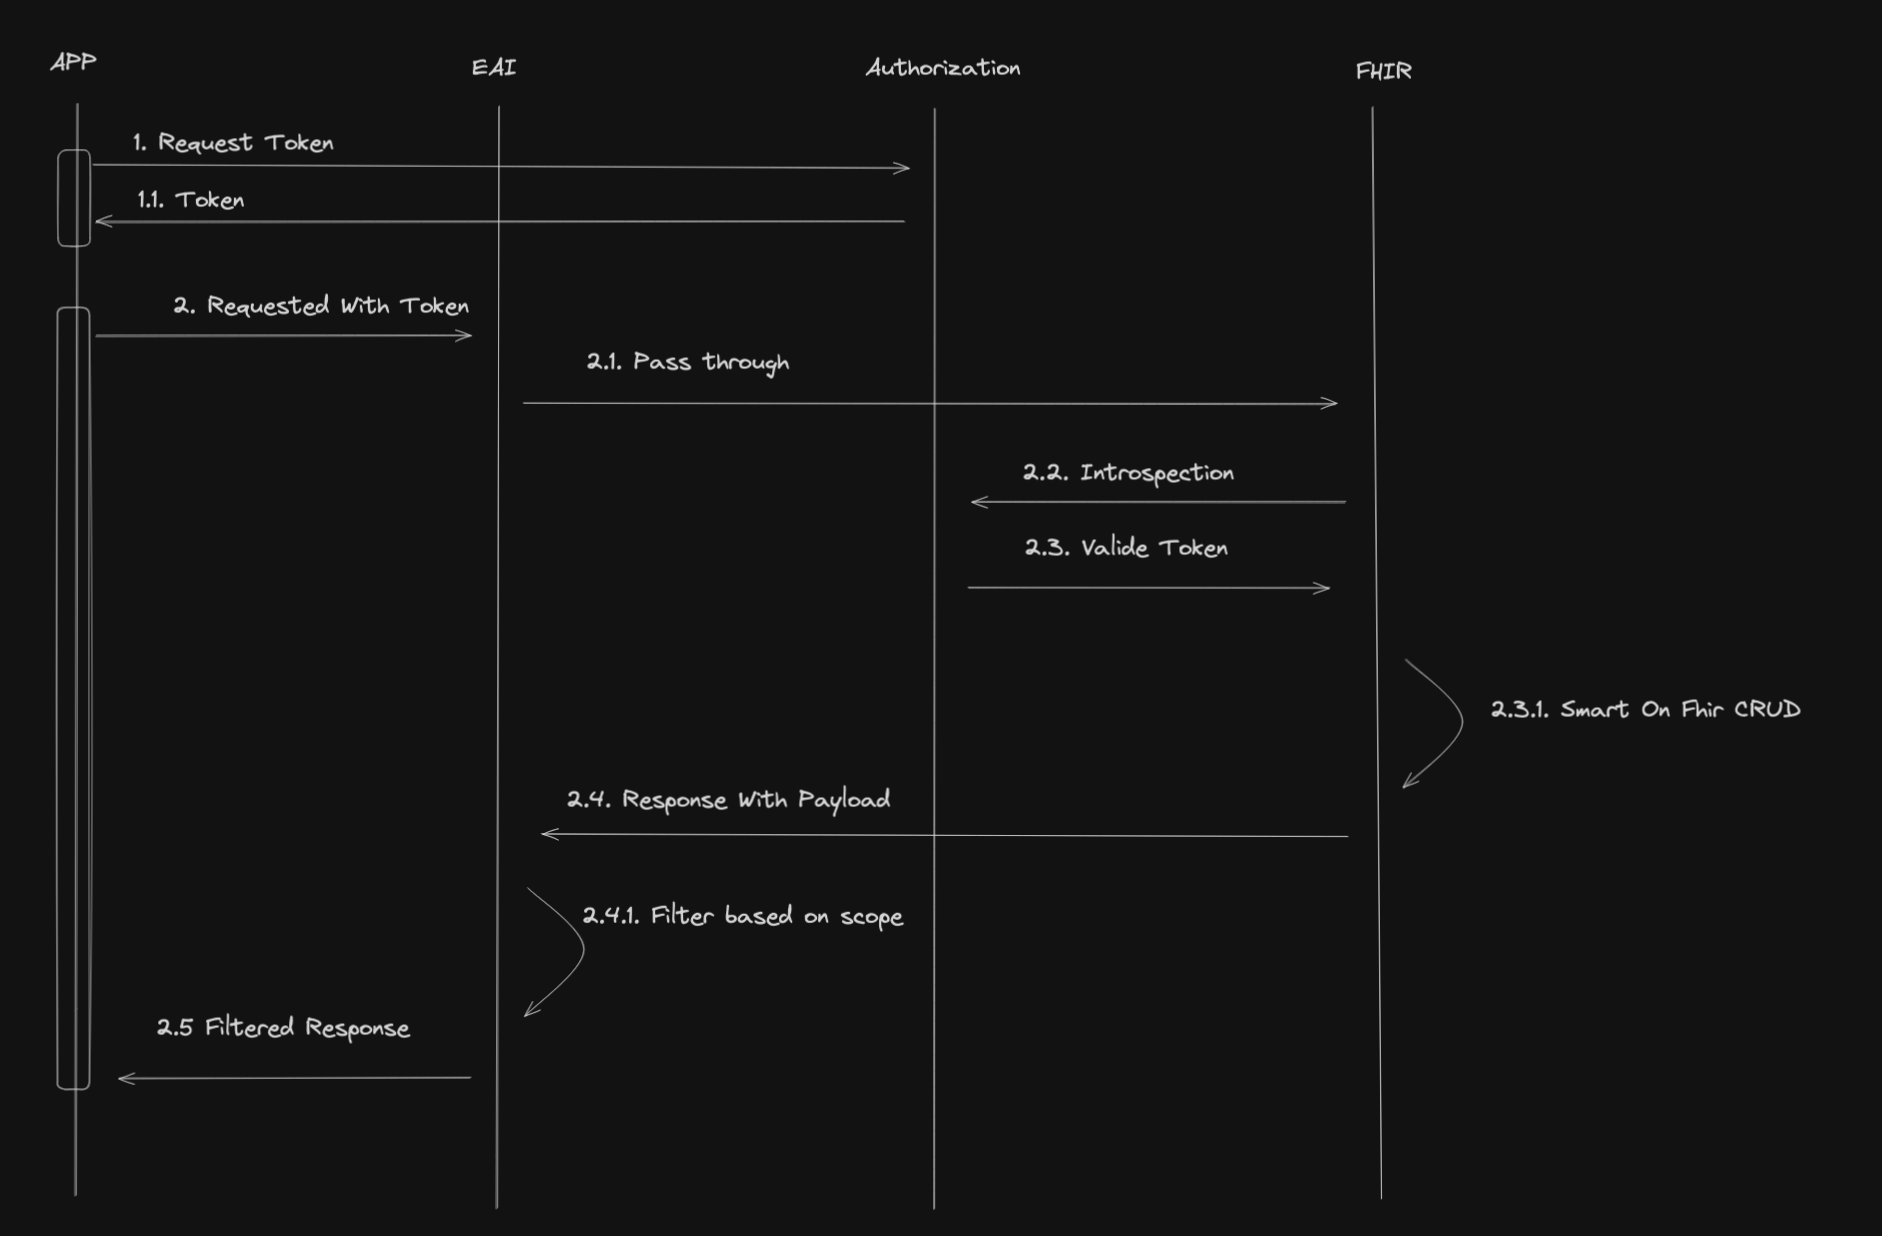
And here is the workflow:
What we notice here is that the EAI (Interoperability capabilities of IRIS for Health) will act as a path through for incoming requests to the FHIR server.
Will filter the response from the FHIR server based on scopes and send the filtered response to the client application.
Before going further, let me make a quick introduction to the Interoperability capabilities of IRIS for Health.
7.1. Interoperability Framework
This is the IRIS Framework.

The whole point of this framework is to provide a way to connect different systems together.
We have 4 main components:
- Business Services: The entry point of the framework. It receives the incoming request and sends it to the production.
- Business Processes: The workflow of the framework. It processes the incoming request and sends it to the business operation.
- Business Operations: The exit point of the framework. It processes the incoming request and sends it to the business service.
- Messages: The data of the framework. It contains the incoming request and the outgoing response.
For this training, we will use the following components:
- One
Business Serviceto receive the incoming request from the client application. - One
Business Processto filter the response from the FHIR server based on scopes. - One
Business Operationto send messages to the FHIR server.
For this training, we will be using a pre-built interoperability production.
And we will only focus on the Business Process to filter the response from the FHIR server based on scopes.
7.2. Install the IoP
For this part, we will use the IoP tool. IoP stands for Interoperability on Python.
You can install the IoP tool by following the instructions on the IoP repository
IoP is pre-installed in the training environment.
Connect to the running container:
docker exec -it formation-fhir-python-iris-1 bash
And run the following command:
iop --init
This will install iop on the IRIS for Health container.
7.3. Create the Interoperability Production
Still in the container, run the following command:
iop --migrate /irisdev/app/src/python/EAI/settings.py
This will create the interoperability production.
Now you can access the interoperability production at the following URL:
http://localhost:8089/csp/healthshare/eai/EnsPortal.ProductionConfig.zen?$NAMESPACE=EAI&$NAMESPACE=EAI&
You can now start the production.
Great, you have now created the interoperability production. 🥳
7.3.1. Test the Interoperability Production
Get a token from the OAuth2 Authorization Server.
POST https://localhost:4443/oauth2/token
Content-Type: application/x-www-form-urlencoded
Authorization : Basic <client_id>:<client_secret>

grant_type=client_credentials&scope=user/Patient.read&aud=https://webgateway/fhir/r5
⚠️ WARNING ⚠️ : we change the aud parameter to the URL of the Web Gateway to expose the FHIR server over HTTPS.
Get a patient through the interoperability production.
GET https://localhost:4443/fhir/Patient
Authorization : Bearer <Token>
Accept: application/fhir+json
You can see the trace of the request in the interoperability production.
http://localhost:8089/csp/healthshare/eai/EnsPortal.MessageViewer.zen?SOURCEORTARGET=Python.EAI.bp.MyBusinessProcess
7.4. Modify the Business Process
All the code for the Business Process is in this file : https://github.com/grongierisc/formation-fhir-python/blob/main/src/python/EAI/bp.py
For this training, we will be as a TTD (Test Driven Development) approach.
All the tests for the Business Process are in this file : https://github.com/grongierisc/formation-fhir-python/blob/main/src/python/tests/EAI/test_bp.py
7.4.1. Prepare your development environment
To prepare your development environment, we need to create a virtual environment.
python3 -m venv .venv
source .venv/bin/activate
pip install -r requirements.txt
7.4.2. Run the tests
To run the tests, you can use the following command:
pytest
Tests are failing.
7.4.3. Implement the code
We have 4 functions to implement:
check_tokenon_fhir_requestfilter_patient_resourcefilter_resources
You can implement the code in the https://github.com/grongierisc/formation-fhir-python/blob/main/src/python/EAI/bp.py file.
7.4.3.1. check_token
This function will check if the token is valid and if the scope contains the VIP scope.
If the token is valid and the scope contains the VIP scope, the function will return True, otherwise it will return False.
We will use the jwt library to decode the token.
Click to see the code
def check_token(self, token:str) -> bool:

    # decode the token
    try:
        decoded_token= jwt.decode(token, options={"verify_signature": False})
    except jwt.exceptions.DecodeError:
        return False

    # check if the token is valid
    if 'VIP' in decoded_token['scope']:
        return True
    else:
        return False
7.4.3.2. filter_patient_resource
This function will filter the patient resource.
It will remove the name, address, telecom and birthdate fields from the patient resource.
The function will return the filtered patient resource as a string.
We will use the fhir.resources library to parse the patient resource.
Notice the signature of the function.
The function takes a string as input and returns a string as output.
So we need to parse the input string to a fhir.resources.patient.Patient object and then parse the fhir.resources.patient.Patient object to a string.
Click to see the code
def filter_patient_resource(self, patient_str:str) -> str:
    # filter the patient
    p = patient.Patient(**json.loads(patient_str))
    # remove the name
    p.name = []
    # remove the address
    p.address = []
    # remove the telecom
    p.telecom = []
    # remove the birthdate
    p.birthDate = None

    return p.json()
7.4.3.3. filter_resources
This function will filter the resources.
We need to check the resource type and filter the resource based on the resource type.
If the resource type is Bundle, we need to filter all the entries of the bundle that are of type Patient.
If the resource type is Patient, we need to filter the patient resource.
The function will return the filtered resource as a string.
We will use the fhir.resources library to parse the resource.
Click to see the code
    def filter_resources(self, resource_str:str) -> str:
        # parse the payload
        payload_dict = json.loads(resource_str)

        # what is the resource type?
        resource_type = payload_dict['resourceType'] if 'resourceType' in payload_dict else 'None'
        self.log_info('Resource type: ' + resource_type)

        # is it a bundle?
        if resource_type == 'Bundle':
            obj = bundle.Bundle(**payload_dict)
            # filter the bundle
            for entry in obj.entry:
                if entry.resource.resource_type == 'Patient':
                    self.log_info('Filtering a patient')
                    entry.resource = patient.Patient(**json.loads(self.filter_patient_resource(entry.resource.json())))

        elif resource_type == 'Patient':
            # filter the patient
            obj = patient.Patient(**json.loads(self.filter_patient_resource(resource_str)))
        else:
            return resource_str

        return obj.json()
7.4.3.4. on_fhir_request
This function will be the entry point of the Business Process.
It will receive the request from the Business Service, check the token, filter the response from the FHIR server based on scopes and send the filtered response to the Business Service.
The function will return the response from the FHIR server.
We will use the iris library to send the request to the FHIR server.
The message will be a iris.HS.FHIRServer.Interop.Request object.
This object contains the request to the FHIR server.
This includes the Method, the URL, the Headers and the Payload.
To check the token, we will use the check_token function and use the header USER:OAuthToken to get the token.
To filter the response, we will use the filter_resources function and use the QuickStream to read the response from the FHIR server.
Click to see the code
def on_fhir_request(self, request:'iris.HS.FHIRServer.Interop.Request'):
    # Do something with the request
    self.log_info('Received a FHIR request')

    # pass it to the target
    rsp = self.send_request_sync(self.target, request)

    # Try to get the token from the request
    token = request.Request.AdditionalInfo.GetAt("USER:OAuthToken") or ""

    # Do something with the response
    if self.check_token(token):
        self.log_info('Filtering the response')
        # Filter the response
        payload_str = self.quick_stream_to_string(rsp.QuickStreamId)

        # if the payload is empty, return the response
        if payload_str == '':
            return rsp

        filtered_payload_string = self.filter_resources(payload_str)
        if filtered_payload_string == '':
            return rsp

        # write the json string to a quick stream
        quick_stream = self.string_to_quick_stream(filtered_payload_string)

        # return the response
        rsp.QuickStreamId = quick_stream._Id()

    return rsp
7.4.4. Run the tests
To run the tests, you can use the following command:
pytest
Tests are passing. 🥳
You can now test the Business Process with the interoperability production.
8. Create the custom operation
Last part of the training. 🏁
We will create a custom operation on the FHIR server.
The custom operation will be a Patient merge operation, the result will be the diff of the 2 patients.
example:
POST https://localhost:4443/fhir/r5/Patient/1/$merge
Authorization : Bearer <Token>
Accept: application/fhir+json
Content-Type: application/fhir+json

{
  "resourceType": "Patient",
  "id": "2",
  "meta": {
    "versionId": "2"
  }
}
The response will be the diff of the 2 patients.
{
    "values_changed": {
        "root['address'][0]['city']": {
            "new_value": "fdsfd",
            "old_value": "Lynnfield"
        },
        "root['meta']['lastUpdated']": {
            "new_value": "2024-02-24T09:11:00Z",
            "old_value": "2024-02-28T13:50:27Z"
        },
        "root['meta']['versionId']": {
            "new_value": "1",
            "old_value": "2"
        }
    }
}
Before going further, let me make a quick introduction to the custom operation on the FHIR server.
There is 3 types of custom operation:
- Instance Operation: The operation is performed on a specific instance of a resource.
- Type Operation: The operation is performed on a type of resource.
- System Operation: The operation is performed on the FHIR server.
For this training, we will use the Instance Operation to create the custom operation.
8.1. Coding the custom operation
A custom operation must inherit from the OperationHandler class from the FhirInteraction module.
Here is the signature of the OperationHandler class:
class OperationHandler(object):

    @abc.abstractmethod
    def add_supported_operations(self,map:dict) -> dict:
        """
        @API Enumerate the name and url of each Operation supported by this class
        @Output map : A map of operation names to their corresponding URL.
        Example:
        return map.put("restart","http://hl7.org/fhir/OperationDefinition/System-restart")
        """

    @abc.abstractmethod
    def process_operation(
        self,
        operation_name:str,
        operation_scope:str,
        body:dict,
        fhir_service:'iris.HS.FHIRServer.API.Service',
        fhir_request:'iris.HS.FHIRServer.API.Data.Request',
        fhir_response:'iris.HS.FHIRServer.API.Data.Response'
    ) -> 'iris.HS.FHIRServer.API.Data.Response':
        """
        @API Process an Operation request.
        @Input operation_name : The name of the Operation to process.
        @Input operation_scope : The scope of the Operation to process.
        @Input fhir_service : The FHIR Service object.
        @Input fhir_request : The FHIR Request object.
        @Input fhir_response : The FHIR Response object.
        @Output : The FHIR Response object.
        """
As we did in the previous part, we will use a TTD (Test Driven Development) approach.
All the tests for the custom operation are in this file : https://github.com/grongierisc/formation-fhir-python/blob/main/src/python/tests/FhirInteraction/test_custom.py
8.1.1. add_supported_operations
This function will add the Patient merge operation to the supported operations.
The function will return a dictionary with the name of the operation and the URL of the operation.
Be aware that the input dict can be empty.
The expected output is:
{
  "resource":
    {
      "Patient":
        [
          {
            "name": "merge",
            "definition": "http://hl7.org/fhir/OperationDefinition/Patient-merge"
          }
        ]
    }
}
This json document will be added to the CapabilityStatement of the FHIR server.
Click to see the code
def add_supported_operations(self,map:dict) -> dict:
    """
    @API Enumerate the name and url of each Operation supported by this class
    @Output map : A map of operation names to their corresponding URL.
    Example:
    return map.put("restart","http://hl7.org/fhir/OperationDefinition/System-restart")
    """

    # verify the map has attribute resource
    if not 'resource' in map:
        map['resource'] = {}
    # verify the map has attribute patient in the resource
    if not 'Patient' in map['resource']:
        map['resource']['Patient'] = []
    # add the operation to the map
    map['resource']['Patient'].append({"name": "merge" , "definition": "http://hl7.org/fhir/OperationDefinition/Patient-merge"})

    return map
8.1.2. process_operation
This function will process the Patient merge operation.
The function will return the diff of the 2 patients.
We will make use of deepdiff library to get the diff of the 2 patients.
The input parameters are:
operation_name: The name of the operation to process.operation_scope: The scope of the operation to process.body: The body of the operation.fhir_service: The FHIR Service object.- fhir_service.interactions.Read
- Is a method to read a resource from the FHIR server.
- Input parameters are:
resource_type: The type of the resource to read.resource_id: The id of the resource to read.
- Output is a
%DynamicObjectobject.
- fhir_service.interactions.Read
fhir_request: The FHIR Request object.- fhir_request.Json
- Property to get the body of the request, it's a
%DynamicObjectobject.
- Property to get the body of the request, it's a
- fhir_request.Json
fhir_response: The FHIR Response object.- fhir_response.Json
- Property to set the body of the response, it's a
%DynamicObjectobject.
- Property to set the body of the response, it's a
- fhir_response.Json
%DynamicObject is a class to manipulate JSON objects.
It's the same as a Python dictionary but for ObjectScript.
Load a JSON object:
json_str = fhir_request.Json._ToJSON()
json_obj = json.loads(json_str)
Set a JSON object:
json_str = json.dumps(json_obj)
fhir_response.Json._FromJSON(json_str)
Make sure went process_operation is called to check if the operation_name is merge, the operation_scope is Instance and the RequestMethod is POST.
Click to see the code
def process_operation(
    self,
    operation_name:str,
    operation_scope:str,
    body:dict,
    fhir_service:'iris.HS.FHIRServer.API.Service',
    fhir_request:'iris.HS.FHIRServer.API.Data.Request',
    fhir_response:'iris.HS.FHIRServer.API.Data.Response'
) -> 'iris.HS.FHIRServer.API.Data.Response':
    """
    @API Process an Operation request.
    @Input operation_name : The name of the Operation to process.
    @Input operation_scope : The scope of the Operation to process.
    @Input fhir_service : The FHIR Service object.
    @Input fhir_request : The FHIR Request object.
    @Input fhir_response : The FHIR Response object.
    @Output : The FHIR Response object.
    """
    if operation_name == "merge" and operation_scope == "Instance" and fhir_request.RequestMethod == "POST":
        # get the primary resource
        primary_resource = json.loads(fhir_service.interactions.Read(fhir_request.Type, fhir_request.Id)._ToJSON())
        # get the secondary resource
        secondary_resource = json.loads(fhir_request.Json._ToJSON())
        # retun the diff of the two resources
        # make use of deepdiff to get the difference between the two resources
        diff = DeepDiff(primary_resource, secondary_resource, ignore_order=True).to_json()

        # create a new %DynamicObject to store the result
        result = iris.cls('%DynamicObject')._FromJSON(diff)

        # set the result to the response
        fhir_response.Json = result

    return fhir_response
Test it :
POST https://localhost:4443/fhir/r5/Patient/1/$merge
Authorization : Bearer <Token>
Accept: application/fhir+json

{
  "resourceType": "Patient",
  "id": "2",
  "meta": {
    "versionId": "2"
  }
}
You will get the diff of the 2 patients.
{
    "values_changed": {
        "root['address'][0]['city']": {
            "new_value": "fdsfd",
            "old_value": "Lynnfield"
        },
        "root['meta']['lastUpdated']": {
            "new_value": "2024-02-24T09:11:00Z",
            "old_value": "2024-02-28T13:50:27Z"
        },
        "root['meta']['versionId']": {
            "new_value": "1",
            "old_value": "2"
        }
    }
}
Great, you have now created the custom operation. 🥳
9. Tips & Tricks
9.1. Csp log
In %SYS
set ^%ISCLOG = 5
zw ^ISCLOG
9.2. BP Solution
Click to see the code
from grongier.pex import BusinessProcess
import iris
import jwt
import json
from fhir.resources import patient, bundle

class MyBusinessProcess(BusinessProcess):

    def on_init(self):
        if not hasattr(self, 'target'):
            self.target = 'HS.FHIRServer.Interop.HTTPOperation'
            return

    def on_fhir_request(self, request:'iris.HS.FHIRServer.Interop.Request'):
        # Do something with the request
        self.log_info('Received a FHIR request')

        # pass it to the target
        rsp = self.send_request_sync(self.target, request)

        # Try to get the token from the request
        token = request.Request.AdditionalInfo.GetAt("USER:OAuthToken") or ""

        # Do something with the response
        if self.check_token(token):
            self.log_info('Filtering the response')
            # Filter the response
            payload_str = self.quick_stream_to_string(rsp.QuickStreamId)

            # if the payload is empty, return the response
            if payload_str == '':
                return rsp

            filtered_payload_string = self.filter_resources(payload_str)
            if filtered_payload_string == '':
                return rsp

            # write the json string to a quick stream
            quick_stream = self.string_to_quick_stream(filtered_payload_string)

            # return the response
            rsp.QuickStreamId = quick_stream._Id()

        return rsp

    def check_token(self, token:str) -> bool:

        # decode the token
        decoded_token= jwt.decode(token, options={"verify_signature": False})

        # check if the token is valid
        if 'VIP' in decoded_token['scope']:
            return True
        else:
            return False

    def quick_stream_to_string(self, quick_stream_id) -> str:
        quick_stream = iris.cls('HS.SDA3.QuickStream')._OpenId(quick_stream_id)
        json_payload = ''
        while quick_stream.AtEnd == 0:
            json_payload += quick_stream.Read()

        return json_payload

    def string_to_quick_stream(self, json_string:str):
        quick_stream = iris.cls('HS.SDA3.QuickStream')._New()

        # write the json string to the payload
        n = 3000
        chunks = [json_string[i:i+n] for i in range(0, len(json_string), n)]
        for chunk in chunks:
            quick_stream.Write(chunk)

        return quick_stream

    def filter_patient_resource(self, patient_str:str) -> str:
        # filter the patient
        p = patient.Patient(**json.loads(patient_str))
        # remove the name
        p.name = []
        # remove the address
        p.address = []
        # remove the telecom
        p.telecom = []
        # remove the birthdate
        p.birthDate = None

        return p.json()

    def filter_resources(self, resource_str:str) -> str:
        # parse the payload
        payload_dict = json.loads(resource_str)

        # what is the resource type?
        resource_type = payload_dict['resourceType'] if 'resourceType' in payload_dict else 'None'
        self.log_info('Resource type: ' + resource_type)

        # is it a bundle?
        if resource_type == 'Bundle':
            obj = bundle.Bundle(**payload_dict)
            # filter the bundle
            for entry in obj.entry:
                if entry.resource.resource_type == 'Patient':
                    self.log_info('Filtering a patient')
                    entry.resource = patient.Patient(**json.loads(self.filter_patient_resource(entry.resource.json())))

        elif resource_type == 'Patient':
            # filter the patient
            obj = patient.Patient(**json.loads(self.filter_patient_resource(resource_str)))
        else:
            return resource_str

        return obj.json()
Comments
This is ridiculously good work, the implementation of the custom operation and the fact it is a patient merge is fantastic. I have found native object de-duping, deepdiff, and two line list de-duping in python to be a way to quickly get to the point with FHIR Resource pair manipulation.
Thank you for taking the time on this, most likely going to have to read it a few times and load it up on my eReader.
One thing I'd add to tips and tricks from something I stole from someone somewhere:
     zn "<FHIRNAMESPACE>"
    Set ^FSLogChannel("all")=1
    zn "%SYS"
    Kill ^%ISCLOG
	Set ^%ISCLOG=5
	Set ^%ISCLOG("Category","HSFHIR")=5
	Set ^%ISCLOG("Category","HSFHIRServer")=5
	Set ^%ISCLOG("Category","OAuth2")=5
	Set ^%ISCLOG("Category","OAuth2Server")=5
Seems to give up a good mix of token processing and fhir calls debuggery.
thanks @sween,
I take good note of your tips for debugging, because it can become quickly a mess with too much info in ^ISCLOG
This illustrates a particular subject that seems to be getting some traction in the FHIR community as a "FHIR Interceptor"... personally I have implemented this competency using an api manager (Kong, API Gateway) through an integration layer (function) prior to hitting IRIS which works but splits the business logic in two differnet places.
Your way here keeps the "intercepts" in IRIS and the resource server which I like.
Here is the "intercept layer" concept ablaze: https://darrendevitt.com/building-a-fhir-intercept-layer/